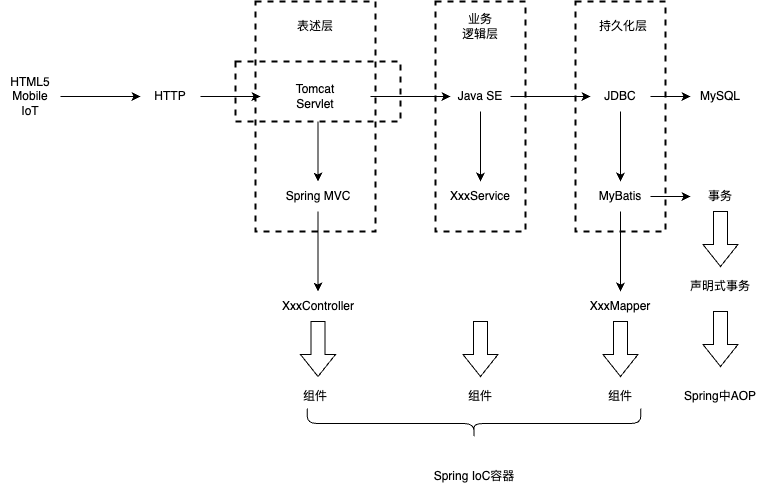
Spring MVC学习 Part01 SSM=Spring + Spring MVC + MyBatis
SSM技术栈如下
表述层
SSM框架构建起单体项目的技术栈需求!其中Spring MVC负责表述层(控制层)实现简化。
Spring MVC的作用主要覆盖式表述层,例如:
请求映射
数据输入
视图界面
请求分发
表单回显
会话控制
过滤拦截
异步交互
文件上传
文件下载
数据校验
类型转换
等等等
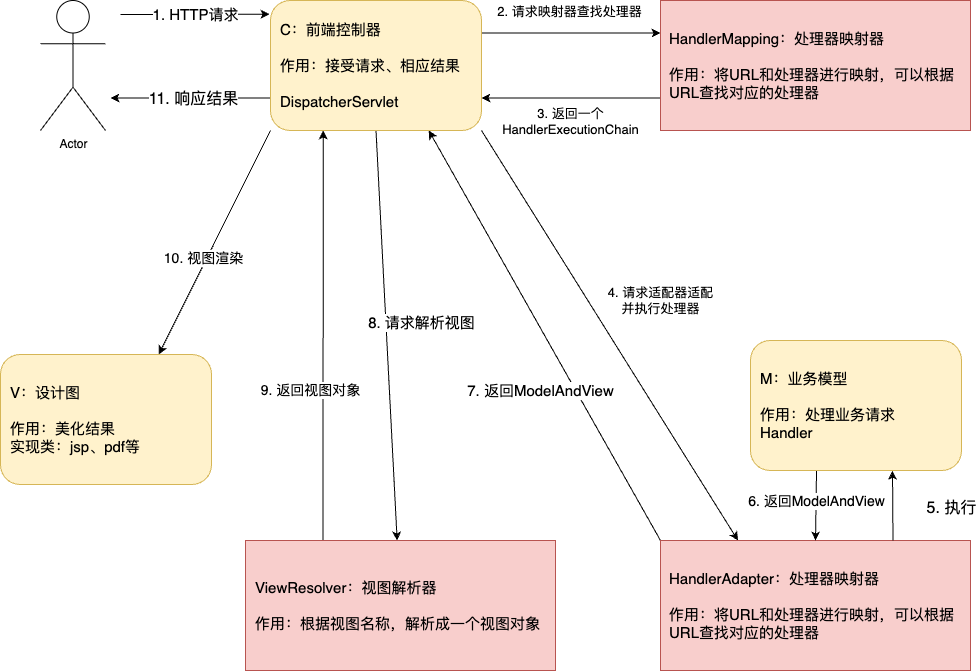
1. Spring MVC处理流程
用户发送请求至前端控制器 DispatcherServlet。
DispatcherServlet 收到请求调用 HandlerMapping 处理器映射器。
处理器映射器根据请求 url 找到具体的处理器,生成处理器对象及处理器拦截器(如果有则生成)一并返回给 DispatcherServlet。
DispatcherServlet 通过 HandlerAdapter 处理器适配器调用处理器。
HandlerAdapter 执行处理器(handler,也叫后端控制器)。
Controller 执行完成返回 ModelAndView。
HandlerAdapter 将 handler 执行结果 ModelAndView 返回给 DispatcherServlet
DispatcherServlet 将 ModelAndView 传给 ViewReslover 视图解析器。
ViewReslover 解析后返回具体 View 对象。
DispatcherServlet 对 View 进行渲染视图(即将模型数据填充至视图中
DispatcherServlet 响应用户。
Spring MVC涉及组件理解:
DispatcherServlet:Spring MVC提供,需要使用web.xml配置使其生效,它是整个流处理的核心,所有请求都经过它的处理的分发。
HandlerMapping:Spring MVC提供,需要进行IoC配置使其加入IoC容器方可生效。它内部缓存handler(Controller方法)和handler访问路径数据,被DispatcherServlet调用,用于查找路径对应的handler
HandlerAdapter:Spring MVC提供,需要进行IoC配置使其加入IoC容器方可生效。它可以处理请求参数和处理响应数据。每次DispatcherServlet都是通过handlerAdapter间接调用handler,它是handler和DispatcherServlet之间的适配器
Handler:处理器,是Controller类内部方法的简称,由自己定义,用来接收参数,向后调用业务,最终返回响应结果
ViewResovler:Spring MVC提供,需要进行IoC配置使其加入IoC容器方可生效。视图解析器主要作用简化模板视图页面查找。前后端分离项目,后端只返回JSON数据 。视图解析器组件不是必须的。
2. 新建Spring MVC项目 在父工程的pom.xml文件导入相关依赖
1
2
3
4
5
6
7
8
9
10
11
12
13
14
15
16
17
18
19
20
21
22
23
24
25
26
27
28
29
30
31
32
33
34
35
36
37
38
39
40
41
42
<?xml version="1.0" encoding="UTF-8" ?> <project xmlns ="http://maven.apache.org/POM/4.0.0" xmlns:xsi ="http://www.w3.org/2001/XMLSchema-instance" xsi:schemaLocation ="http://maven.apache.org/POM/4.0.0 http://maven.apache.org/xsd/maven-4.0.0.xsd" > <modelVersion > 4.0.0</modelVersion > <groupId > org.example</groupId > <artifactId > SpringMVCStudy</artifactId > <version > 1.0-SNAPSHOT</version > <packaging > pom</packaging > <modules > <module > spring-mvc-part01</module > </modules > <properties > <spring.version > 6.1.4</spring.version > <servlet.api > 10.0.0</servlet.api > <maven.compiler.source > 21</maven.compiler.source > <maven.compiler.target > 21</maven.compiler.target > <project.build.sourceEncoding > UTF-8</project.build.sourceEncoding > </properties > <dependencies > <dependency > <groupId > org.springframework</groupId > <artifactId > spring-context</artifactId > <version > ${spring.version}</version > </dependency > <dependency > <groupId > jakarta.platform</groupId > <artifactId > jakarta.jakartaee-web-api</artifactId > <version > ${servlet.api}</version > <scope > provided</scope > </dependency > <dependency > <groupId > org.springframework</groupId > <artifactId > spring-webmvc</artifactId > <version > ${spring.version}</version > </dependency > </dependencies > </project >
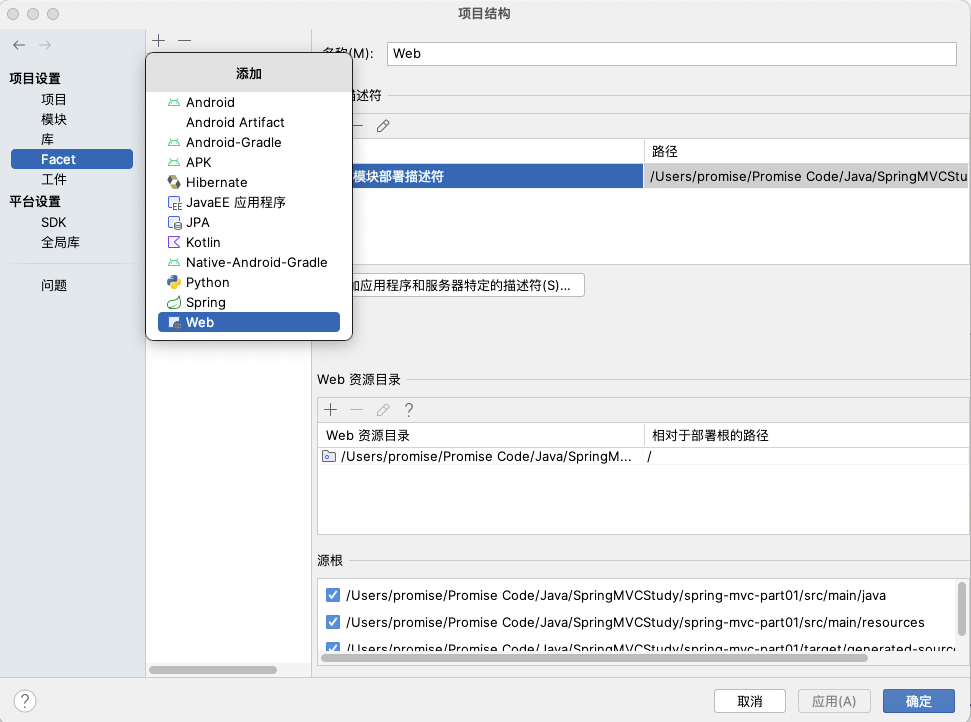
子模块名spring-mvc-part01,并且将改模块更改为web项目,在“文件—>项目—>项目结构”添加web相关
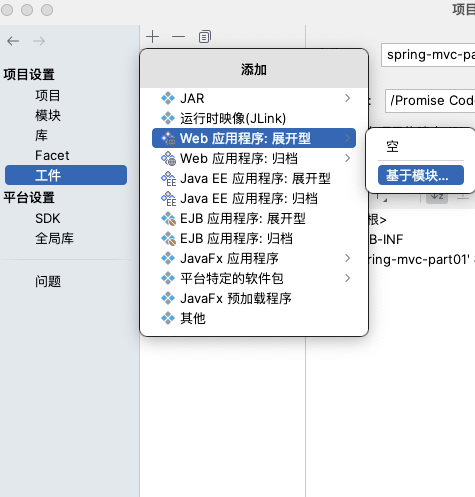
添加工件
新建Controller,controller.HelloController
1
2
3
4
5
6
7
8
9
10
11
12
13
14
15
16
17
18
19
20
21
22
23
24
package org.example.controller;import org.springframework.stereotype.Controller;import org.springframework.web.bind.annotation.RequestMapping;import org.springframework.web.bind.annotation.ResponseBody;@Controller public class HelloController {@RequestMapping("springmvc/hello") @ResponseBody public String hello () {"HelloController.hello" );return "Hello Spring MVC!" ;
新建配置类,将Controller配置到IoC容器中,config.MVCConfig.java
1
2
3
4
5
6
7
8
9
10
11
12
13
14
15
16
17
18
19
20
21
22
23
24
25
26
27
28
29
30
31
package org.example.config;import org.springframework.context.annotation.Bean;import org.springframework.context.annotation.ComponentScan;import org.springframework.context.annotation.Configuration;import org.springframework.web.servlet.mvc.method.annotation.RequestMappingHandlerAdapter;import org.springframework.web.servlet.mvc.method.annotation.RequestMappingHandlerMapping;@Configuration @ComponentScan("org.example.controller") public class MVCConfig {@Bean public RequestMappingHandlerMapping handlerMapping () {return new RequestMappingHandlerMapping ();@Bean public RequestMappingHandlerAdapter handlerAdapter () {return new RequestMappingHandlerAdapter ();
配置Spring MVC
1
2
3
4
5
6
7
8
9
10
11
12
13
14
15
16
17
18
19
20
21
22
23
24
25
26
27
28
29
30
31
32
33
34
35
36
37
38
39
40
41
42
43
44
45
46
47
48
49
50
51
52
53
54
55
56
57
58
59
60
61
62
63
64
package org.example.config;import org.springframework.web.servlet.support.AbstractAnnotationConfigDispatcherServletInitializer;public class SpringMVCInit extends AbstractAnnotationConfigDispatcherServletInitializer {@Override protected Class<?>[] getRootConfigClasses() {return null ;@Override protected Class<?>[] getServletConfigClasses() {return new Class []{MVCConfig.class}; @Override protected String[] getServletMappings() {return new String []{"/" };
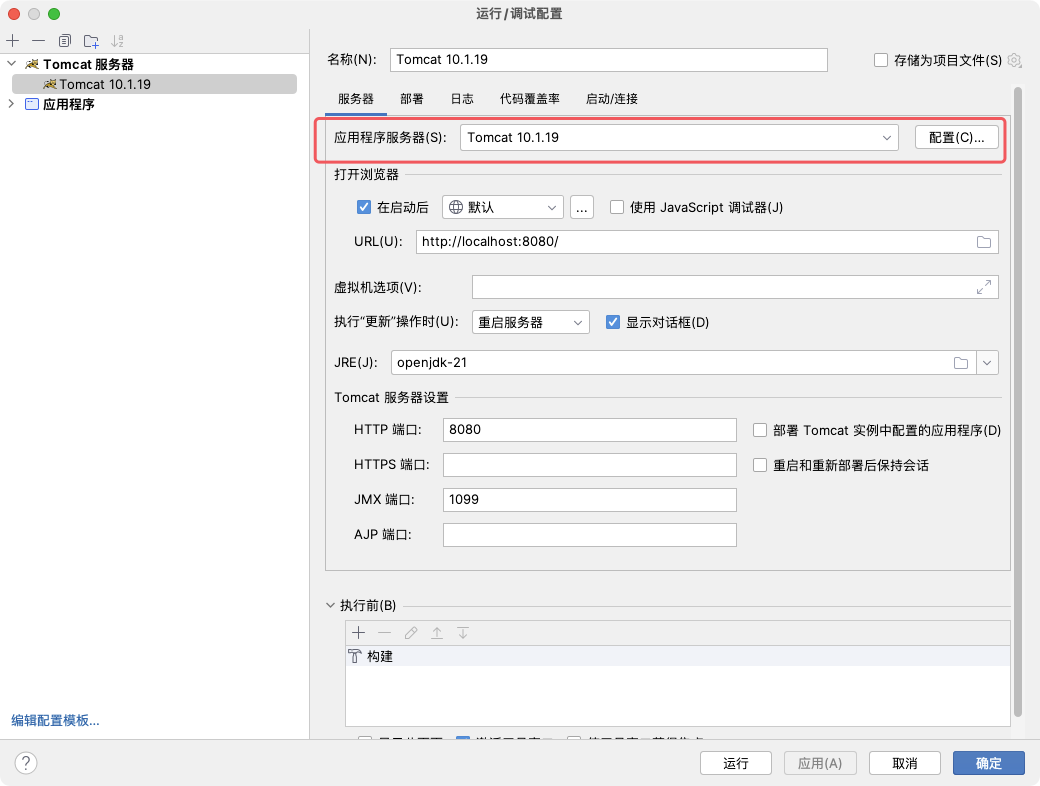
3. 搭建Tomcat(macOS下) apache-tomcat-10.1.19.zip
下载tomcat压缩包,进行解压。进入到idea中,将红框内的路径修改为解压后的路径。
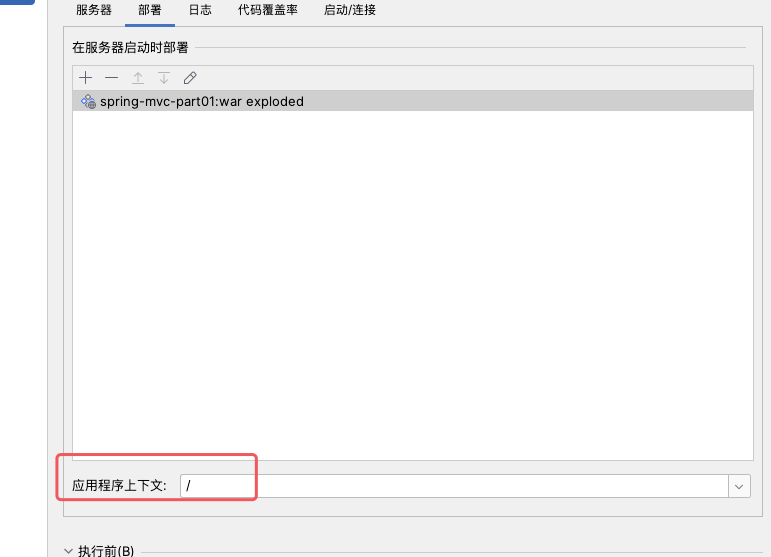
在“部署”栏目中添加之前新建的“工件”,并且上下文更改为/
到解压路径下,修改*.sh文件的启动权限
启动tomcat
关闭tomcat
此时已经可以使用idea来启动Tomcat服务器
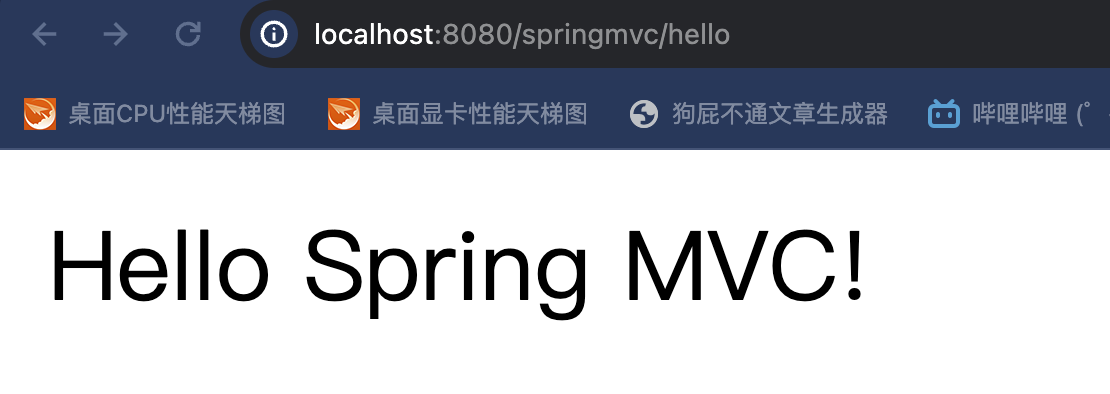
运行,输入URLhttp://localhost:8080/springmvc/hello
4. Spring MVC接收数据 4.1 访问路径 @RequestMapping注解的作用是将请求的URL地址和处理请求的方式(handler方法)关联起来,建立映射的关系
不同于WebServlet必须要使用/开头,但是在SpringMVC中不一定必须要用/开头
支持模糊地址。*:任意一层字符串 **:任意层任意字符串。
/user/* —> /user/a可以进入,/user/a/b不可以进入
/user/** —> /user/a/a/a/a/a
请求方式的指定:使用属性method,若不符合请求方式,会出现405 异常
1
2
3
4
5
6
7
8
9
10
11
12
13
14
15
16
17
18
19
20
21
22
23
24
25
26
27
28
29
30
31
32
33
34
35
package org.example.requestmapping;import org.springframework.stereotype.Controller;import org.springframework.web.bind.annotation.RequestMapping;import org.springframework.web.bind.annotation.RequestMethod;@Controller @RequestMapping("/user") public class UserController {@RequestMapping(value = "/login", method = {RequestMethod.GET, RequestMethod.POST}) public String login () {return null ;@RequestMapping(value = "/register", method = RequestMethod.POST) public String register () {return null ;@RequestMapping public String index () {return null ;
@GetMapping和@PostMapping注解
均继承自@RequestMapping,但是他们只能用于注解方法
@RequestMapping(value = "/register", method = RequestMethod.POST)等价于@PostRequest("register")
GET POST PUT DELETE同理
@RequestMapping注解
value = "***":路径method = RequestMethod.***:请求方法
5. Spring MVC接收数据 param格式:key1=value1&key2=value2
JSON格式:{"key1": "value1", "key2": "value2"}
param格式是ASCII码,JSON为UTF-8。类型方面,param仅支持字符串类型,而JSON可以更复杂
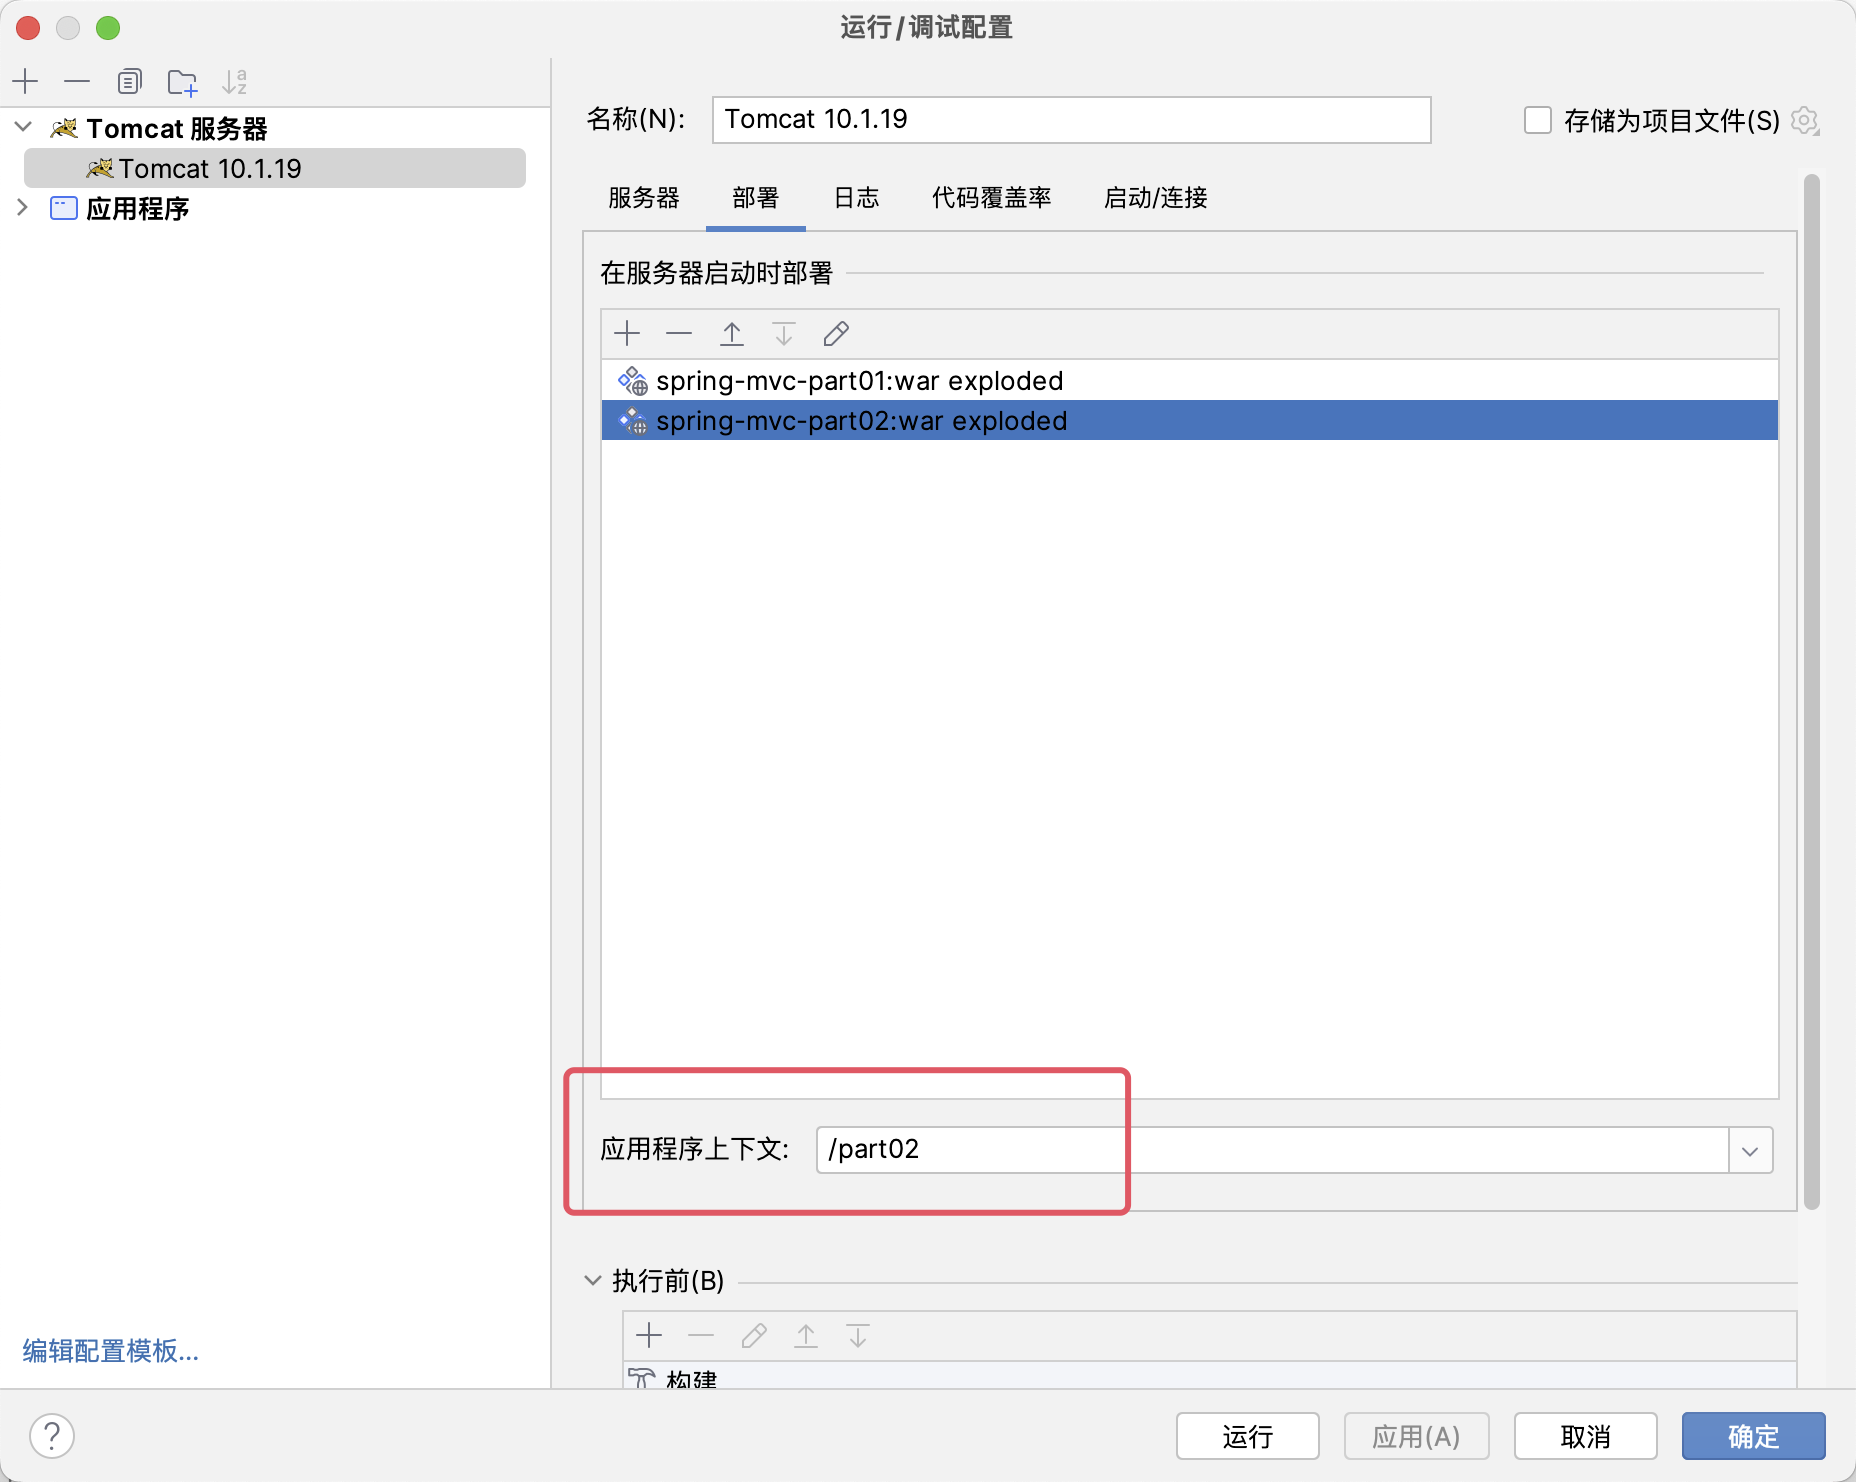
新建模块spring-mvc-part02,并且按照之前的方法重新配置web项目,部署Tomcat时,“应用程序上下文”更改为/part02
此处使用三种接收参数方式:
直接接收
注解指定:指定任意请求参数名,要求必须传递
特殊值
新建Controller,param.ParamController
5.1 直接接收 1 2 3 4 5 6 7 8 9 10 11 12 13 14 15 16 17 18 19 20 21 package org.example.param;import org.springframework.stereotype.Controller;import org.springframework.web.bind.annotation.*;@Controller @RequestMapping("/param") public class ParamController {@GetMapping("/data") @ResponseBody public String data (String name, int age) {"name = " + name + ", age = " + age);return "name = " + name + ", age = " + age;
新建配置类config.MVCConfig
1 2 3 4 5 6 7 8 9 10 11 12 13 14 15 16 17 18 19 20 21 22 23 24 25 26 27 28 package org.example.config;import org.springframework.context.annotation.Bean;import org.springframework.context.annotation.ComponentScan;import org.springframework.context.annotation.Configuration;import org.springframework.web.servlet.mvc.method.annotation.RequestMappingHandlerAdapter;import org.springframework.web.servlet.mvc.method.annotation.RequestMappingHandlerMapping;@Configuration @ComponentScan("org.example") public class MVCConfig {@Bean public RequestMappingHandlerMapping handlerMapping () {return new RequestMappingHandlerMapping ();@Bean public RequestMappingHandlerAdapter handlerAdapter () {return new RequestMappingHandlerAdapter ();
Spring MVC初始化
1 2 3 4 5 6 7 8 9 10 11 12 13 14 15 16 17 18 19 20 21 22 23 24 25 26 27 package org.example.config;import org.springframework.web.servlet.support.AbstractAnnotationConfigDispatcherServletInitializer;public class SpringMVCInit extends AbstractAnnotationConfigDispatcherServletInitializer {@Override protected Class<?>[] getRootConfigClasses() {return new Class [0 ];@Override protected Class<?>[] getServletConfigClasses() {return new Class []{MVCConfig.class};@Override protected String[] getServletMappings() {return new String []{"/" };
启动服务器,在浏览器输入相应URL
http://localhost:8080/part02/param/data?name=root&age=18
5.2 注解指定 @RequestParam参数
只加在形参列表,指定请求参数名,或者是否为必须传递,或者非必须传递设置默认值
用法如下
String func(@RequestParam(value = ""), required = true)
value = "***":前端传过来的参数名required = true/false:是否为必须传递项,默认为必须(若不传递会报400 异常)defaultValue = "1":默认值为1
在param.ParamController.java继续添加方法
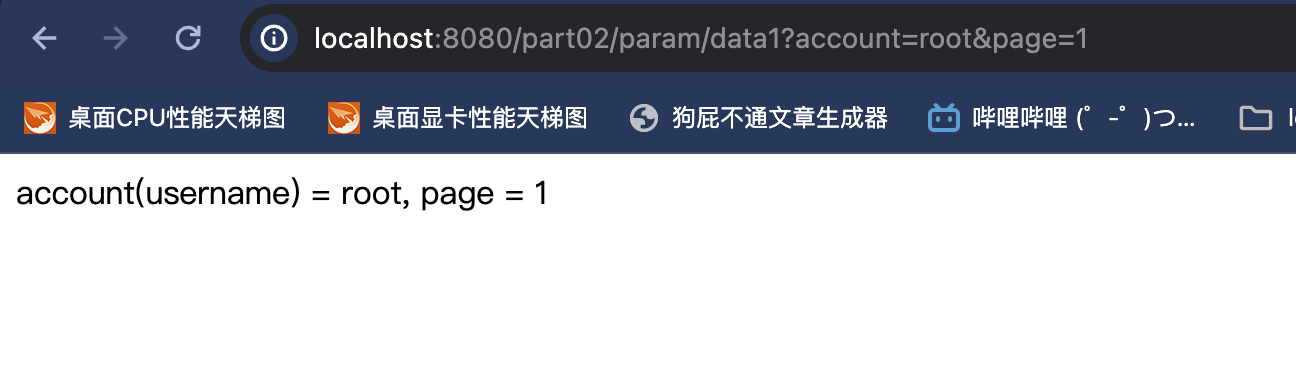
1 2 3 4 5 6 7 8 9 10 @GetMapping("/data1") @ResponseBody public String data1 (@RequestParam(value = "account") String username, @RequestParam(required = false, defaultValue = "1") int page) {"account(username) = " + username + ", page = " + page);return "account(username) = " + username + ", page = " + page;
5.3 特殊值 继续在ParamController添加方法
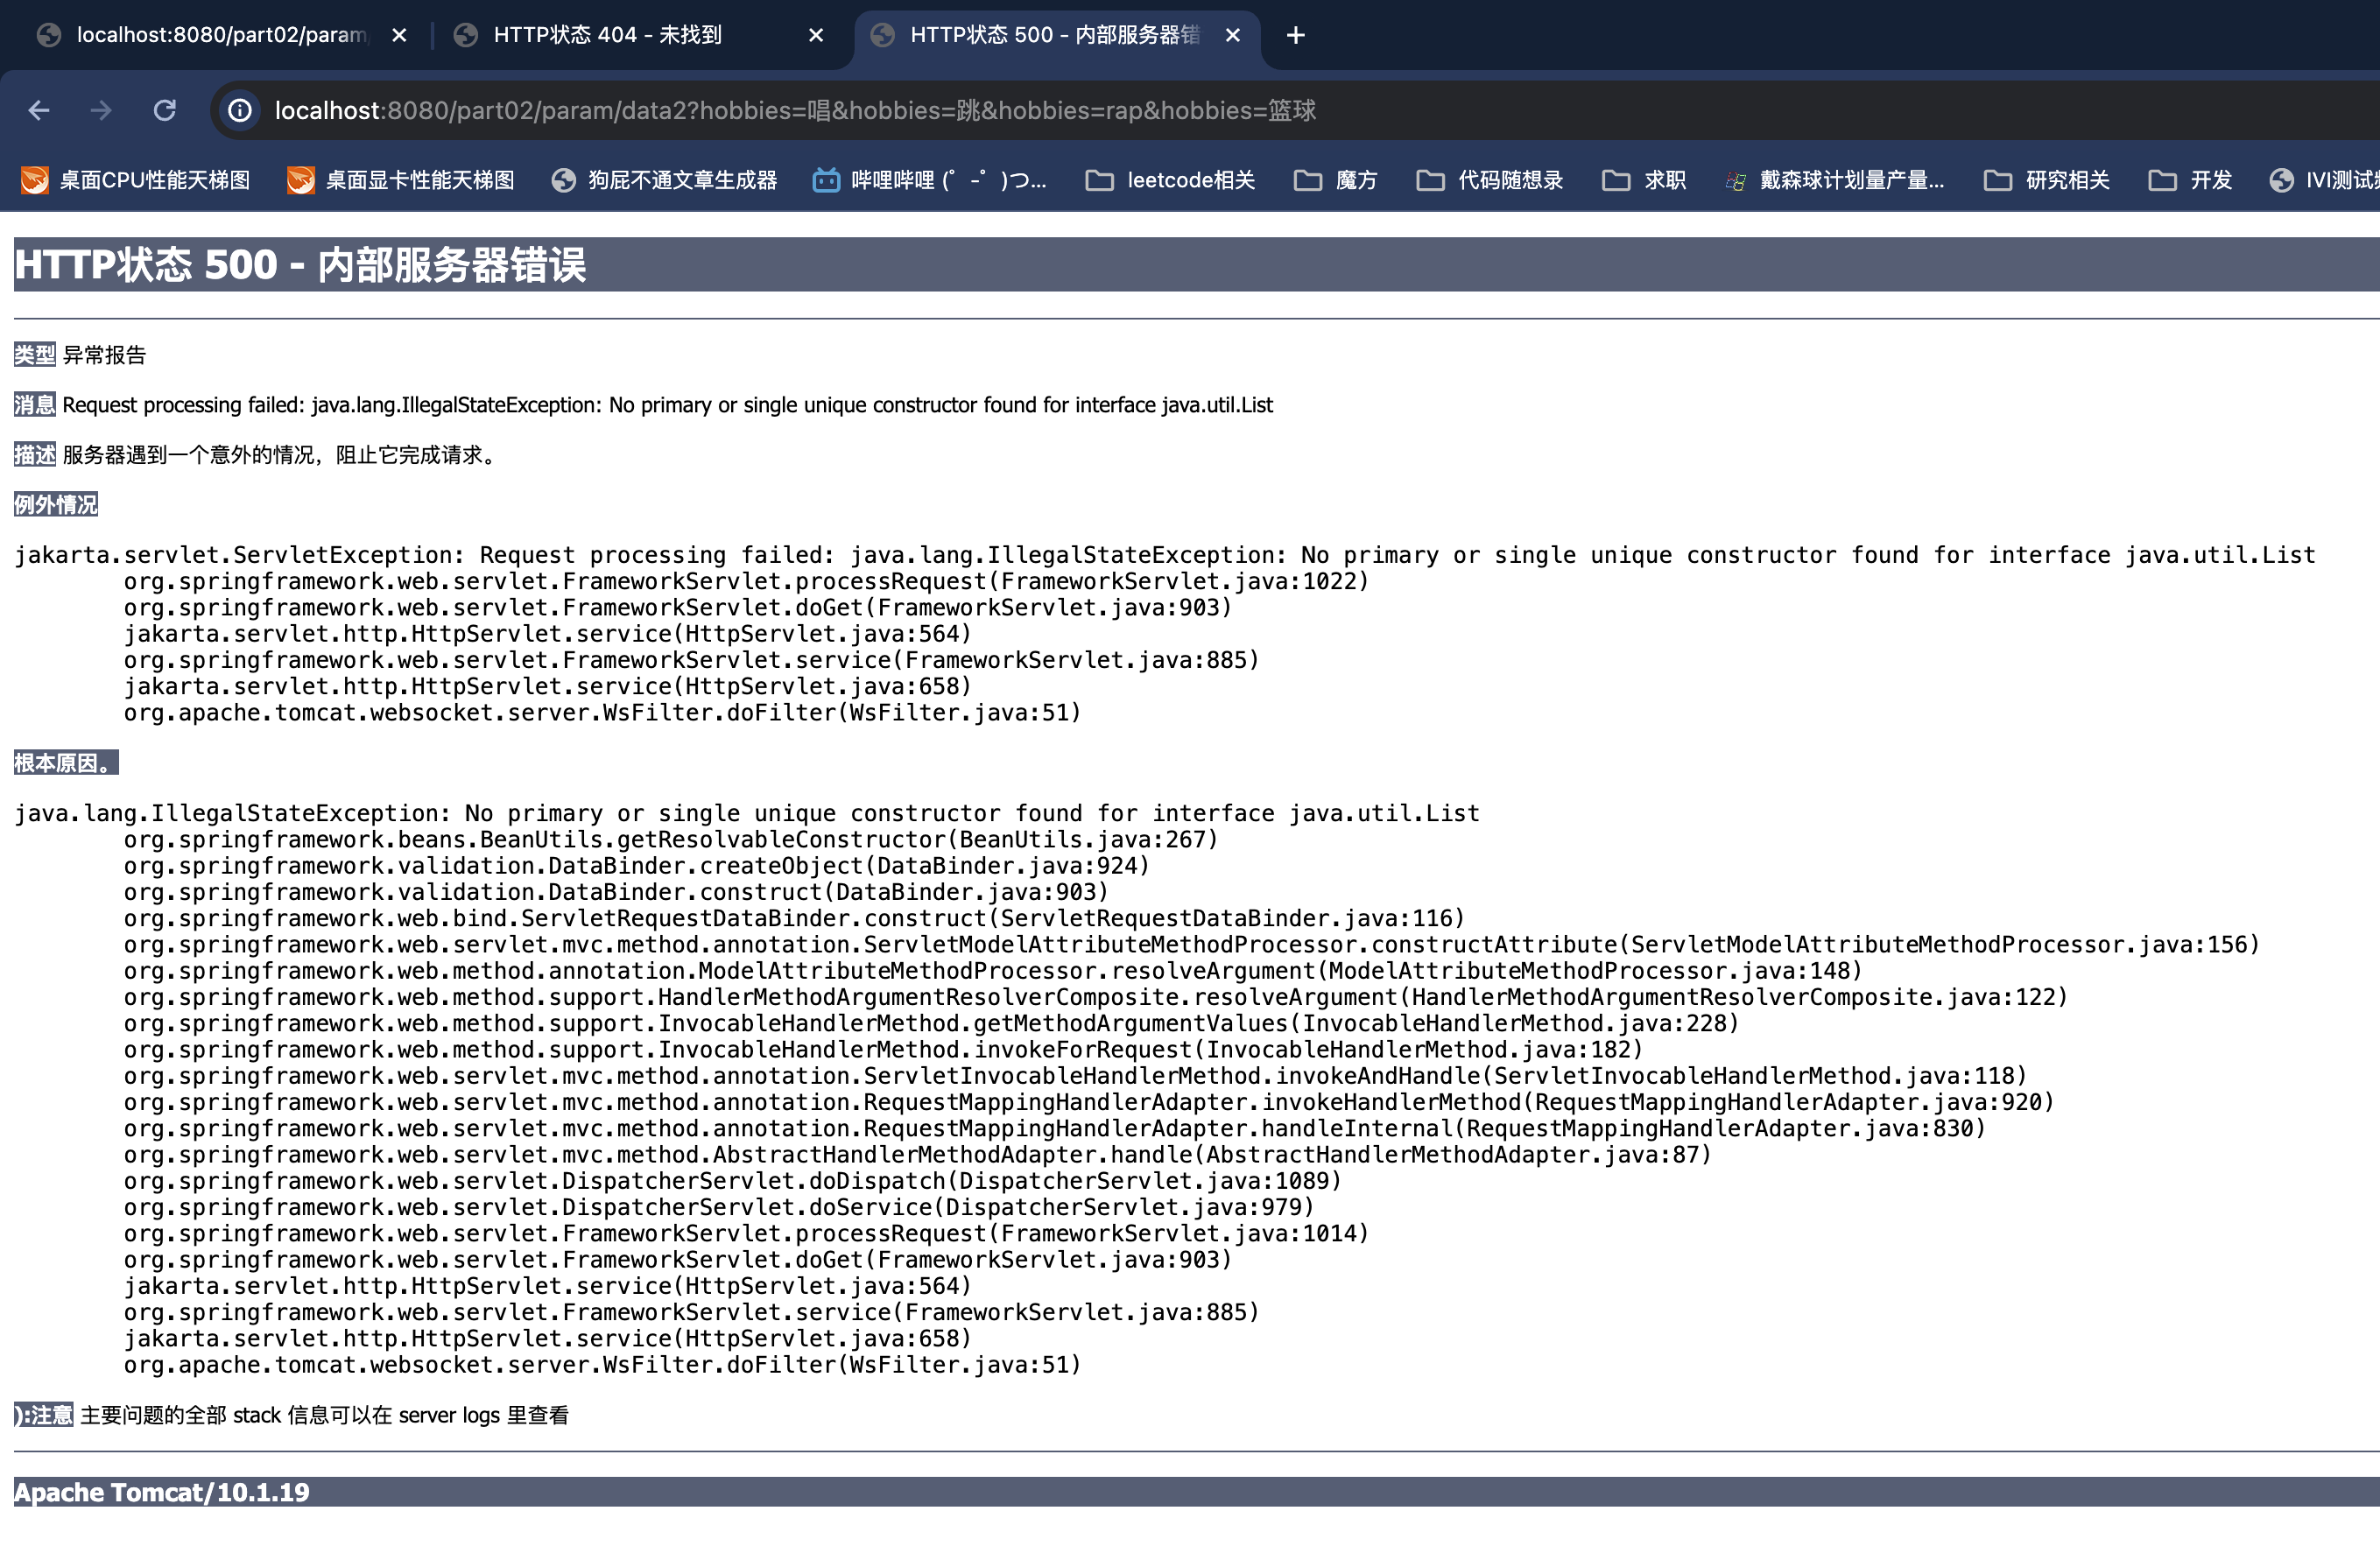
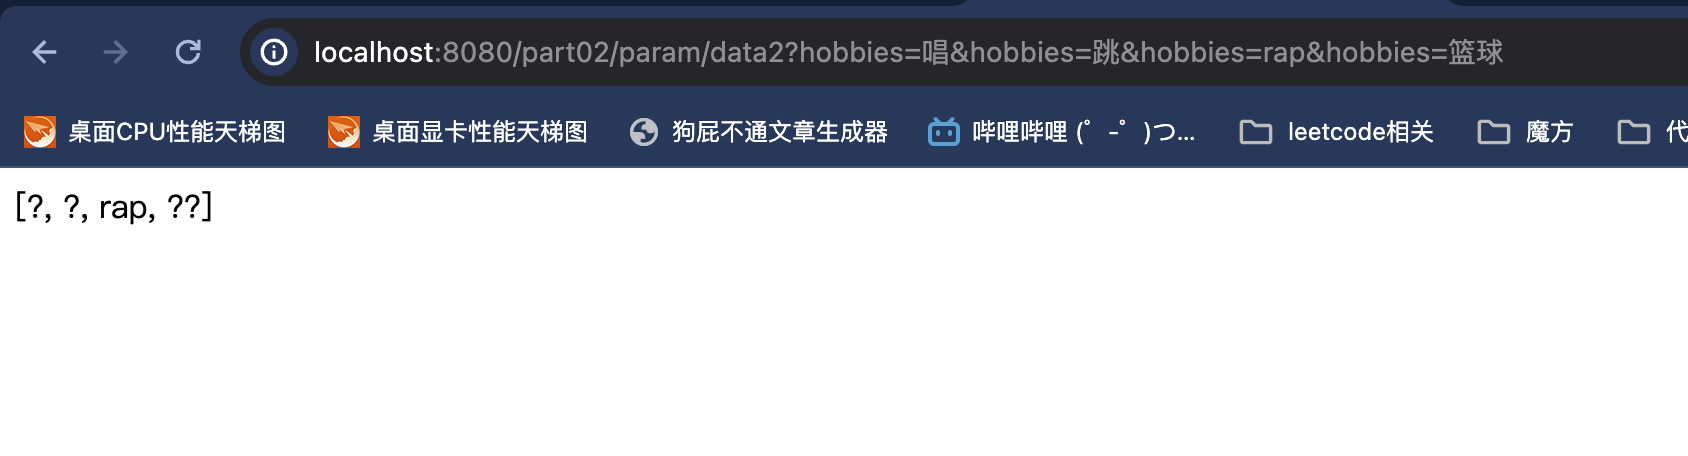
1 2 3 4 5 6 7 8 9 @GetMapping("/data2") @ResponseBody public String data2 (@RequestParam List<String> hobbies) {"hobbies = " + hobbies);return hobbies.toString();
注意:此处的参数必须要添加@RequestParam,将hobbies对应的一个字符才能直接赋值给集合,报错类型异常。加了此注解之后才可add相应字符串
下图为不加@RequestParam注解报错的情况
添加注解之后
控制台的输出
现在解决编码的问题
需要将类注解的@RequestMapping中增加属性即可。
@RequestMapping(value = "/param", produces = "text/plain;charset=UTF-8")
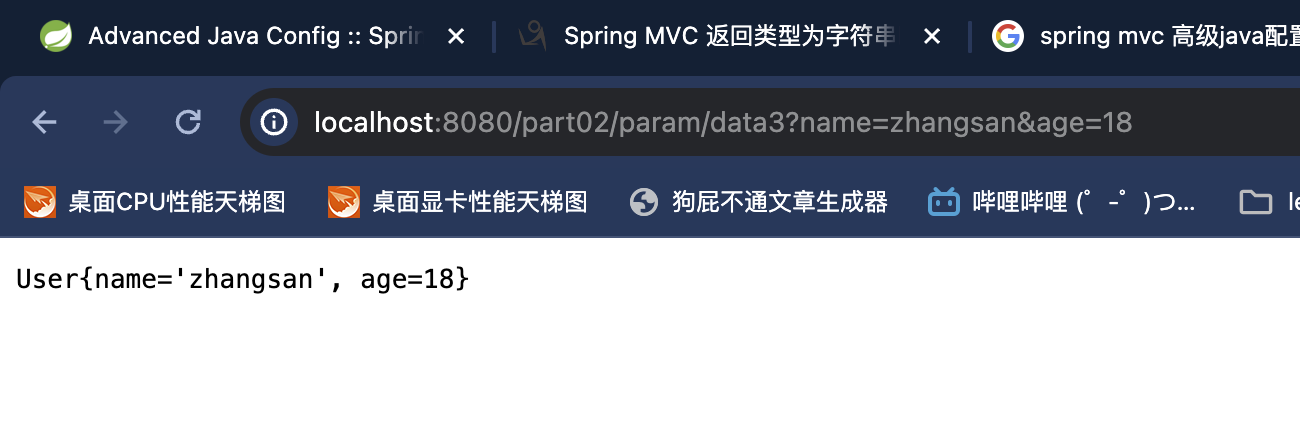
5.4 使用实体对象接收值(*) 创建实体类pojo.User
1 2 3 4 5 6 7 8 9 10 11 12 13 14 15 16 17 18 19 20 21 22 23 24 25 26 27 28 29 30 31 32 33 34 35 36 37 38 39 package org.example.pojo;import org.springframework.stereotype.Component;public class User {private String name;private int age;public String getName () {return name;public void setName (String name) {this .name = name;public int getAge () {return age;public void setAge (int age) {this .age = age;@Override public String toString () {return "User{" +"name='" + name + '\'' +", age=" + age +'}' ;
添加方法
1 2 3 4 5 6 7 8 9 @GetMapping("/data3") @ResponseBody public String data3 (User user) { return user.toString();
若传输过来的属性对应不到实体对象,也不会进行赋值。
5.5 路径传参 新建Controller,path.Controller
1 2 3 4 5 6 7 8 9 10 11 12 13 14 15 16 17 18 19 20 21 22 23 24 25 26 package org.example.path;import org.springframework.stereotype.Controller;import org.springframework.web.bind.annotation.GetMapping;import org.springframework.web.bind.annotation.RequestMapping;import org.springframework.web.bind.annotation.RequestParam;import org.springframework.web.bind.annotation.ResponseBody;@Controller @RequestMapping("path") public class PathController {@GetMapping("{account}/{password}") @ResponseBody public String login () {
@GetMapping(“{account}/{password}”)
等价于@GetMapping("*/*"),但是使用星号并不能获取到参数。
若按照如下形式写,代表接收param类型的值
1 2 3 4 5 @GetMapping("{account}/{password}") @ResponseBody public String login (String account, String password) {
需要使用注解@PathVariable在形参前面,其他属性与@RequestParam中相同,可以设置不同的名字和是否必须项等。
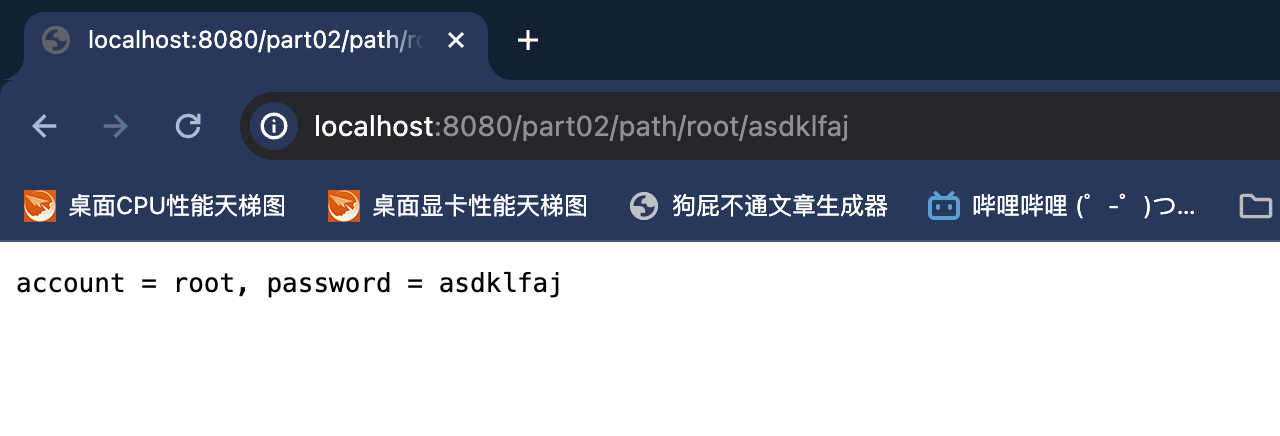
1 2 3 4 5 6 7 8 9 10 11 12 13 14 15 16 17 18 19 20 21 22 23 24 25 26 package org.example.path;import org.springframework.stereotype.Controller;import org.springframework.web.bind.annotation.*;@Controller @RequestMapping(value = "/path", produces = "text/plain;charset=UTF-8") public class PathController {@ResponseBody @GetMapping(value = "/{account}/{password}") public String login (@PathVariable("account") String account, @PathVariable("password") String password) {"account = " + account + ", password = " + password);return "account = " + account + ", password = " + password;
5.6 JSON接收 新建Controller,json.JSONController
1
2
3
4
5
6
7
8
9
10
11
12
13
14
15
16
17
18
19
20
21
22
23
24
25
26
27
package org.example.json;import org.example.pojo.Person;import org.springframework.stereotype.Controller;import org.springframework.web.bind.annotation.PostMapping;import org.springframework.web.bind.annotation.RequestBody;import org.springframework.web.bind.annotation.RequestMapping;import org.springframework.web.bind.annotation.ResponseBody;@Controller @RequestMapping("json") @ResponseBody public class JSONController {@PostMapping("data") public String data (@RequestBody Person person) {"person = " + person);return person.toString();
默认实体类是param类型的,但是想接收JSON格式,需要加入注解@RequestBody
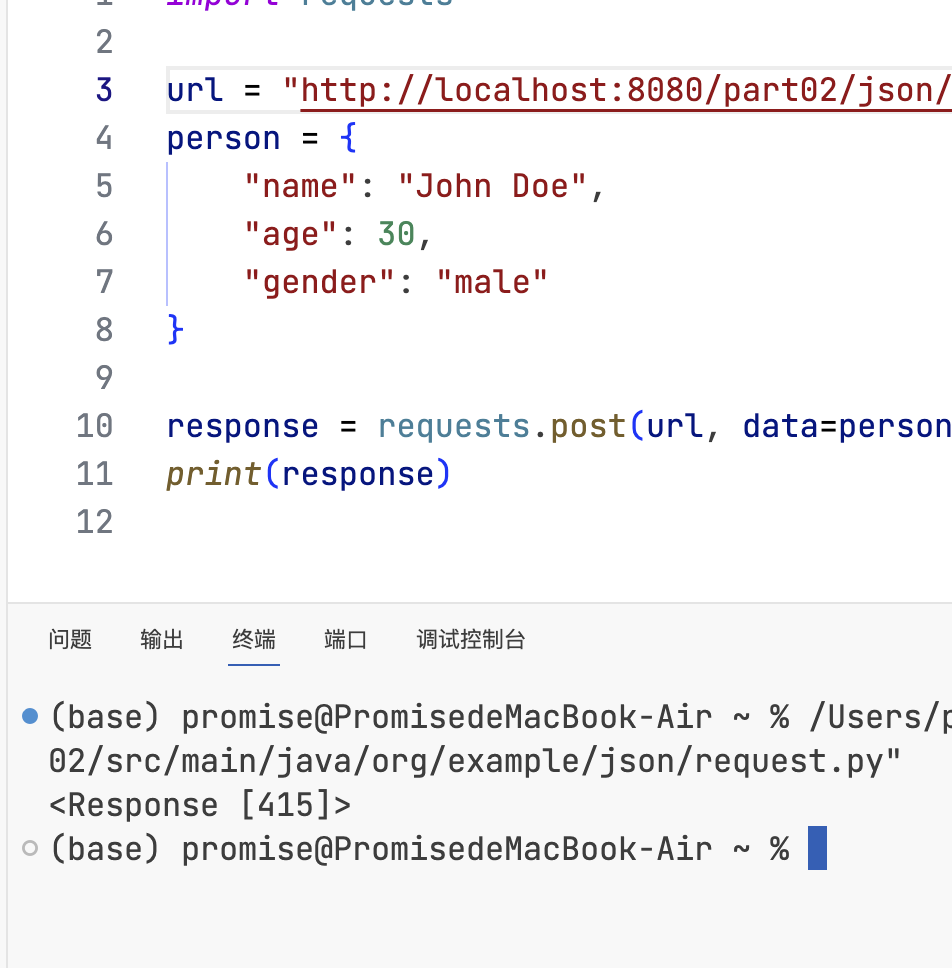
使用Python进行模拟POST请求
1 2 3 4 5 6 7 8 9 10 11 12 import requests"http://localhost:8080/part02/json/data" "name" : "John Doe" ,"age" : 30 ,"gender" : "male" print (response)
模拟POST请求之后会得到以下报错,415 状态码
415类型错误原因???
因为JSON是前端的格式,而不是Java的格式。Java原生的Web API只支持路径参数和param参数。
如果需要项目支持JSON格式需要以下操作:
但是经过一天的Debug还没找到问题的所在,即使python代码我更改为如下的形式
1 2 3 4 5 6 7 8 9 10 11 12 13 14 15 16 17 18 import requestsimport json"http://localhost:8080/part02/json/data" "name" : "John Doe" ,"age" : 30 ,"gender" : "male" "Content-Type" : "application/json" print (response.text)
java代码更改为以下(主要是@PostMapping注解添加了属性)
1 2 3 4 5 @PostMapping(value = "data", consumes = MediaType.APPLICATION_JSON_UTF8_VALUE) public String data (@RequestBody Person person) {"person = " + person);return person.toString();
consumes属性是指定接收的字符串格式,这里为application/json;charset=utf-8
报的错误为
org.springframework.web.servlet.handler.AbstractHandlerExceptionResolver.logException Resolved [org.springframework.web.HttpMediaTypeNotSupportedException: Content-Type ‘application/json;charset=UTF-8’ is not supported]
@EnableWebMvc注解 效果等同于在XML配置中,可以使用<mvc:annotation-driven>元素
5.7 接收cookie @CookieValue
新建Controller,cookie.CookieController
1 2 3 4 5 6 7 8 9 10 11 12 13 14 15 16 17 18 19 20 21 22 23 24 25 26 27 28 29 30 31 32 33 package org.example.cookie;import jakarta.servlet.http.Cookie;import jakarta.servlet.http.HttpServletResponse;import org.springframework.stereotype.Controller;import org.springframework.web.bind.annotation.CookieValue;import org.springframework.web.bind.annotation.GetMapping;import org.springframework.web.bind.annotation.RequestMapping;import org.springframework.web.bind.annotation.ResponseBody;@Controller @RequestMapping("cookie") @ResponseBody public class CookieController {@GetMapping("data") public String data (@CookieValue(value = "cookieName") String value) {"value = " + value);return value;@GetMapping("save") public String save (HttpServletResponse response) {Cookie cookie = new Cookie ("cookieName" , "root" );return "ok" ;
先通过/cookie/save添加一个cookie,再访问/cookie/data返回这个cookie的值
5.8获取请求头 @RequestHeader
@Request***可以查到通过request请求的各种参数
新建Controller,header.HeaderController
1 2 3 4 5 6 7 8 9 10 11 12 13 14 15 16 17 18 19 20 21 22 23 24 package org.example.header;import org.springframework.stereotype.Controller;import org.springframework.web.bind.annotation.GetMapping;import org.springframework.web.bind.annotation.RequestHeader;import org.springframework.web.bind.annotation.RequestMapping;import org.springframework.web.bind.annotation.ResponseBody;@Controller @RequestMapping("header") @ResponseBody public class headerController {@GetMapping("getHeader") public String getHeader (@RequestHeader("Host") String host) {"host = " + host);return host;