Spring学习part06 macOS启动MySQL命令
sudo /usr/local/mysql/support-files/mysql.server start
JdbcTemplate 引入相关依赖
1 2 3 4 5 6 7 8 9 10 11 12 13 14 15 16 17 18 19 20 21 <dependency > <groupId > org.springframework</groupId > <artifactId > spring-jdbc</artifactId > <version > 6.1.2</version > </dependency > <dependency > <groupId > org.springframework</groupId > <artifactId > spring-test</artifactId > <version > 5.3.20</version > </dependency > <dependency > <groupId > mysql</groupId > <artifactId > mysql-connector-java</artifactId > <version > 8.0.30</version > </dependency > <dependency > <groupId > com.alibaba</groupId > <artifactId > druid</artifactId > <version > 1.0.31</version > </dependency >
新建数据库spring
1
2
3
4
5
6
7
CREATE TABLE `t_emp` (INT (11 ) NOT NULL AUTO_INCREMENT,VARCHAR (20 ) DEFAULT NULL COMMENT '姓名' ,INT (11 ) DEFAULT NULL COMMENT '年龄' ,VARCHAR (2 ) DEFAULT NULL COMMENT '性别' , PRIMARY KEY (`id`)= INNODB DEFAULT CHARSET= utf8mb4;
新建jdbc相关配置jdbc.properties
1
2
3
4
jdbc.url =jdbc:mysql://localhost:3306/spring?characterEncoding=utf8&useSSL=false jdbc.driver =com.mysql.cj.jdbc.Driver jdbc.user =root jdbc.password =11111111
新建bean,beans.xml,并配置
1
2
3
4
5
6
7
8
9
10
11
12
13
14
15
16
17
18
19
20
21
22
23
24
<?xml version="1.0" encoding="UTF-8" ?> <beans xmlns ="http://www.springframework.org/schema/beans" xmlns:xsi ="http://www.w3.org/2001/XMLSchema-instance" xmlns:context ="http://www.springframework.org/schema/context" xsi:schemaLocation ="http://www.springframework.org/schema/beans http://www.springframework.org/schema/beans/spring-beans.xsd http://www.springframework.org/schema/context http://www.springframework.org/schema/context/spring-context.xsd" ><context:property-placeholder location ="classpath:jdbc.properties" /> <bean class ="com.alibaba.druid.pool.DruidDataSource" id ="druidDataSource" > <property name ="url" value ="${jdbc.url}" /> <property name ="driverClassName" value ="${jdbc.driver}" /> <property name ="username" value ="${jdbc.user}" /> <property name ="password" value ="${jdbc.password}" /> </bean > <bean class ="org.springframework.jdbc.core.JdbcTemplate" id ="jdbcTemplate" > <property name ="dataSource" ref ="druidDataSource" /> </bean > </beans >
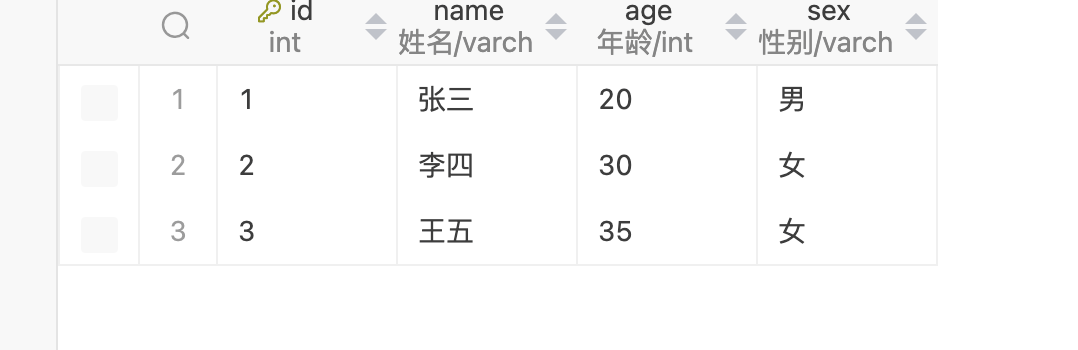
1. CRUD操作 插入 新建测试类jdbc.JdbcTemplateTest.java
1
2
3
4
5
6
7
8
9
10
11
12
13
14
15
16
17
18
19
20
21
22
23
24
25
26
27
28
29
30
31
32
33
34
35
package org.example.jdbc;import org.junit.jupiter.api.Test;import org.springframework.beans.factory.annotation.Autowired;import org.springframework.jdbc.core.JdbcTemplate;import org.springframework.test.context.junit.jupiter.SpringJUnitConfig;@SpringJUnitConfig(locations = "classpath:beans.xml") public class JdbcTemplateTest {@Autowired private JdbcTemplate jdbcTemplate;@Test public void testUpdate1 () {String sql = "INSERT INTO t_emp VALUES (NULL, ?, ?, ?)" ;"王五" , 35 , "女" };
新增一条查看MySQL结果
查看spring输出结果
多插入两条数据
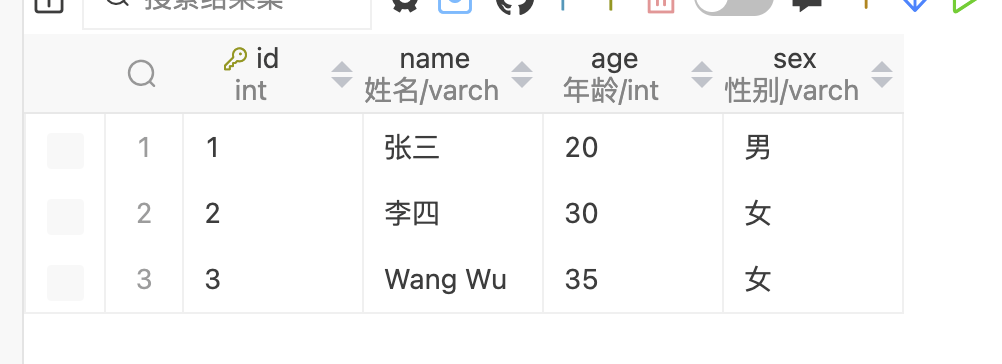
修改 继续添加测试方法
1
2
3
4
5
6
7
@Test public void testUpdate2 () {String sql = "UPDATE t_emp SET name=? WHERE id=?" ;int rows = jdbcTemplate.update(sql, "Wang Wu" , 3 );
MySQL结果如下
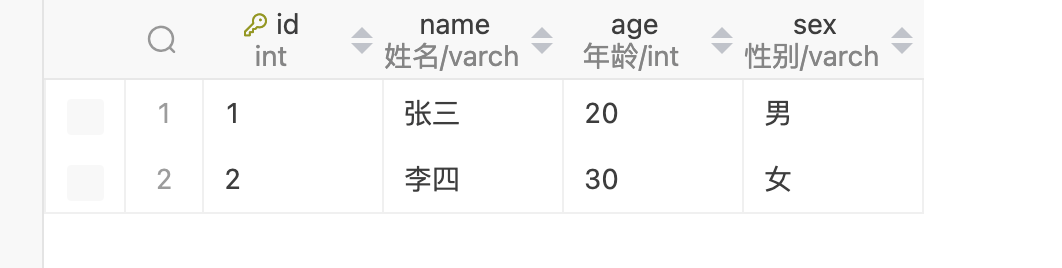
删除 添加删除测试方法
1
2
3
4
5
6
7
@Test public void testUpdate3 () {String sql = "DELETE from t_emp where id=?" ;int rows = jdbcTemplate.update(sql, 3 );
查询 查询:返回对象 新建员工类Emp.java,并且生成getter、setter、toString()
1
2
3
4
5
6
7
8
9
10
11
12
13
14
15
16
17
18
19
20
21
22
23
24
25
26
27
28
29
30
31
32
33
34
35
36
37
38
39
40
41
42
43
44
45
46
47
48
49
50
51
52
53
54
55
56
57
58
59
package org.example.jdbc;import org.springframework.beans.factory.annotation.Autowired;import org.springframework.jdbc.core.JdbcTemplate;public class Emp {private Integer id;private String name;private Integer age;private String sex;public Integer getId () {return id;public void setId (Integer id) {this .id = id;public String getName () {return name;public void setName (String name) {this .name = name;public Integer getAge () {return age;public void setAge (Integer age) {this .age = age;public String getSex () {return sex;public void setSex (String sex) {this .sex = sex;@Override public String toString () {return "Emp{" +"id=" + id +", name='" + name + '\'' +", age=" + age +", sex='" + sex + '\'' +'}' ;
写法一:自行封装 测试方法,查看id为1的用户相关信息
1
2
3
4
5
6
7
8
9
10
11
12
13
@Test public void testReturnObject () {String sql = "SELECT * FROM t_emp WHERE id=?" ;Object o = jdbcTemplate.queryForObject(sql, (rs, rowNum) -> {Emp emp = new Emp ();"name" ));"age" ));"sex" ));return emp;1 );
使用的是public <T> T queryForObject(String sql, RowMapper<T> rowMapper, @Nullable Object... args) throws DataAccessException,使用lambda表达式。
RowMapper<T> rowMapper接口实现源码如下
1
2
3
4
5
public interface RowMapper <T> {@Nullable mapRow (ResultSet rs, int rowNum) throws SQLException;
若不对相关属性赋值返回为null
写法二:使用BeanPropertyRowMapper 1 2 3 4 5 6 7 @Test public void testReturnObject2 () {String sql = "SELECT * FROM t_emp WHERE id=?" ;Object o = jdbcTemplate.queryForObject(sql, new BeanPropertyRowMapper <>(Emp.class), 1 );
BeanPropertyRowMapper实现了相关方法,在参数中放入Emp.class可以直接映射到Emp实体类中。
查询:返回list 查询所有表数据
1
2
3
4
5
6
7
@Test public void testReturnList () {String sql = "SELECT * FROM t_emp" ;new BeanPropertyRowMapper <>(Emp.class));
查询:返回单个值 查询共多少条记录
1 2 3 4 5 6 @Test public void testReturnValue () {String sql = "SELECT COUNT(*) FROM t_emp" ;Integer count = jdbcTemplate.queryForObject(sql, Integer.class);
事务 编程式事务 相关伪代码
1 2 3 4 5 6 7 8 9 10 11 12 13 14 15 16 17 18 Connection conn = ...;try {false );catch (Exception e) {finally {
编程式实现事务的缺陷:
细节没有被屏蔽:具体操作过程中,所有细节都需要程序员自己完成,比较繁琐。
代码复用性不高:如果没有有效抽取出,每次实现功能都需要自己编写代码,代码并没有得到复用
不使用事务会产生的问题:demo
声明式事务 基于注解的声明式事务 需求:用户购买图书的时候,数据库中对书的数量进行变动,用户表对余额进行变动。
创建两个表,t_book和t_user
1 2 3 4 5 6 7 8 9 10 11 12 13 14 15 16 CREATE TABLE `t_book`( INT (11 ) NOT NULL AUTO_INCREMENT COMMENT '主键' ,VARCHAR (20 ) DEFAULT NULL COMMENT '图书名称' ,INT (11 ) DEFAULT NULL COMMENT '价格' ,INT (10 ) UNSIGNED DEFAULT NULL COMMENT '库存(无符号)' ,PRIMARY KEY (`book_id`)= InnoDB DEFAULT CHARSET= utf8mb4 AUTO_INCREMENT= 3 ;CREATE TABLE `t_user` (INT (11 ) NOT NULL AUTO_INCREMENT COMMENT '主键' ,VARCHAR (20 ) DEFAULT NULL COMMENT '用户名' ,INT (10 ) UNSIGNED DEFAULT NULL COMMENT '余额(无符号)' ,PRIMARY KEY (`user_id`)= InnoDB DEFAULT CHARSET= utf8mb4 AUTO_INCREMENT= 2 ;
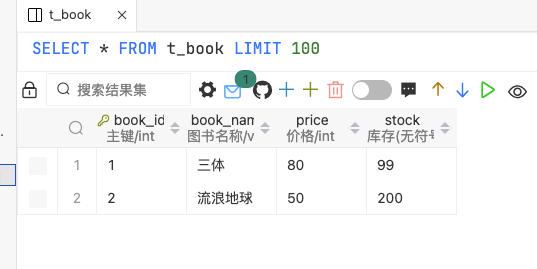
在图书表插入几条数据
1 2 3 4 5 INSERT INTO `t_book` (`book_id`, `book_name`, `price`, `stock`)VALUES (1 , '三体' , 80 , 100 );INSERT INTO `t_book` (`book_id`, `book_name`, `price`, `stock`)VALUES (2 , '流浪地球' , 50 , 200 );
在用户表插入一条数据
1 2 INSERT INTO `t_user` (`user_id`, `username`, `balance`)VALUES (1 , 'admin' , 50 );
实现Controller层, Service层与DAO层
Controller层 1 2 3 4 5 6 7 8 9 10 11 12 13 14 15 16 17 18 19 20 21 22 23 24 25 26 27 28 package org.example.tx.controller;import org.example.tx.service.BookService;import org.springframework.beans.factory.annotation.Autowired;import org.springframework.stereotype.Controller;@Controller public class BookController {@Autowired private BookService bookService;public void buyBook (Integer bookId, Integer userId) {
Service层与实现类 1 2 3 4 5 6 package org.example.tx.service;public interface BookService {public void buyBook (Integer bookId, Integer userId) ;
1 2 3 4 5 6 7 8 9 10 11 12 13 14 15 16 17 18 19 20 21 22 23 24 25 26 27 28 29 30 31 package org.example.tx.service.impl;import org.example.tx.dao.BookDao;import org.example.tx.service.BookService;import org.springframework.beans.factory.annotation.Autowired;import org.springframework.stereotype.Service;@Service public class BookServiceImpl implements BookService {@Autowired private BookDao bookDao;@Override public void buyBook (Integer bookId, Integer userId) {Integer price = bookDao.getBookPriceByBookId(bookId);
DAO层与实现类 1 2 3 4 5 6 7 8 9 10 11 12 13 14 15 package org.example.tx.dao;public interface BookDao {getBookPriceByBookId (Integer bookId) ;void updateStock (Integer bookId) ;void updateUserBalance (Integer userId, Integer price) ;
1 2 3 4 5 6 7 8 9 10 11 12 13 14 15 16 17 18 19 20 21 22 23 24 25 26 27 28 29 30 31 32 33 34 35 36 37 package org.example.tx.dao.impl;import org.example.tx.dao.BookDao;import org.springframework.beans.factory.annotation.Autowired;import org.springframework.jdbc.core.JdbcTemplate;import org.springframework.stereotype.Repository;@Repository public class BookDaoImpl implements BookDao {@Autowired private JdbcTemplate jdbcTemplate;@Override public Integer getBookPriceByBookId (Integer bookId) {String sql = "SELECT price FROM t_book WHERE book_id=?" ;Integer price = jdbcTemplate.queryForObject(sql, Integer.class, bookId);return price;@Override public void updateStock (Integer bookId) {String sql = "UPDATE t_book SET stock=stock-1 WHERE book_id=?" ;@Override public void updateUserBalance (Integer userId, Integer price) {String sql = "UPDATE t_user set balance=balance-? WHERE user_id=?" ;
创建测试类 1 2 3 4 5 6 7 8 9 10 11 12 13 14 15 16 17 18 19 20 21 22 import org.example.tx.controller.BookController;import org.junit.jupiter.api.Test;import org.springframework.beans.factory.annotation.Autowired;import org.springframework.test.context.junit.jupiter.SpringJUnitConfig;@SpringJUnitConfig(locations = "classpath:beans.xml") public class TestBookTx {@Autowired private BookController bookController;@Test public void testBuyBook () {1 , 1 );
图书表更新后结果
用户表更新后结果

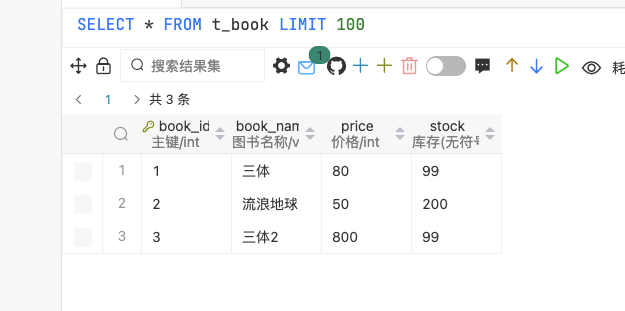
当前存在问题 新增一本书《三体2》,售价800元。
1 2 INSERT INTO `t_book` (`book_id`, `book_name`, `price`, `stock`)VALUES (3 , '三体2' , 800 , 100 );
用户想购买《三体2》但是余额不足会发生什么
1 2 3 4 @Test public void testBuyBook () {3 , 1 );
报错信息如下:
1 2 org.springframework.dao.DataIntegrityViolationException: PreparedStatementCallback; SQL [UPDATE t_user set balance=balance-? WHERE user_id=?]; Data truncation: BIGINT UNSIGNED value is out of range in '(`spring`.`t_user`.`balance` - 800)'
因为余额使用的是无符号数,此时余额还有420元不足以支付800元的书籍。在数据库中报错。
但是图书表数量发生了变化
所以在此需要添加事务进行操作
添加事务 配置bean,在bean.xml文件中,
1 2 3 4 5 6 7 8 9 10 11 12 13 14 15 16 17 18 19 20 21 22 23 24 25 26 27 28 29 30 31 32 33 34 35 36 37 38 39 <?xml version="1.0" encoding="UTF-8" ?> <beans xmlns ="http://www.springframework.org/schema/beans" xmlns:xsi ="http://www.w3.org/2001/XMLSchema-instance" xmlns:context ="http://www.springframework.org/schema/context" xmlns:tx ="http://www.springframework.org/schema/tx" xsi:schemaLocation ="http://www.springframework.org/schema/beans http://www.springframework.org/schema/beans/spring-beans.xsd http://www.springframework.org/schema/context http://www.springframework.org/schema/context/spring-context.xsd http://www.springframework.org/schema/tx http://www.springframework.org/schema/tx/spring-tx.xsd" ><context:property-placeholder location ="classpath:jdbc.properties" /> <bean class ="com.alibaba.druid.pool.DruidDataSource" id ="druidDataSource" > <property name ="url" value ="${jdbc.url}" /> <property name ="driverClassName" value ="${jdbc.driver}" /> <property name ="username" value ="${jdbc.user}" /> <property name ="password" value ="${jdbc.password}" /> </bean > <bean class ="org.springframework.jdbc.core.JdbcTemplate" id ="jdbcTemplate" > <property name ="dataSource" ref ="druidDataSource" /> </bean > <context:component-scan base-package ="org.example.tx" /> <bean class ="org.springframework.jdbc.datasource.DataSourceTransactionManager" id ="transactionManager" > <property name ="dataSource" ref ="druidDataSource" /> </bean > <tx:annotation-driven transaction-manager ="transactionManager" /> </beans >
在实现类前加注解
1 2 3 4 5 6 7 8 9 10 11 12 13 @Transactional @Override public void buyBook (Integer bookId, Integer userId) {Integer price = bookDao.getBookPriceByBookId(bookId);
@Transactional注解标识的位置
@Transactional标识在方法上,则只会影响该方法@Transactional标识在类上,则会影响类中的所有方法
@Transactional属性
readOnly是否只读:如果设置为只读属性,只能进行查询操作,不能进行修改、添加、删除操作
timeout超时(单位是秒):在设置超时时间之内没有完成,抛出异常回滚。默认值-1(不超时)
回滚策略:设置哪些异常不回滚,哪些异常进行回滚。
rollbackFor:需要设置一个Class类型对象rollbackForClassName:需要设置一个字符串类型的全类名noRollbackFor:需要设置一个Class类型对象noRollbackForClassName:需要设置一个字符串类型的全类名
isolation隔离级别:读问题(脏读、幻读、重复读等)
数据库系统必须具有隔离并发运行各个事务的能力,使它们不会相互影响,避免各种并发问题。一个事务与其他事务隔离的程度称为隔离级别。SQL标准中规定了多种事务隔离级别,不同隔离级别对应不同的干扰程度,隔离级别越高,数据一致性就越好,但并发性越弱。
READ UNCOMMITTED:读未提交,允许Transaction01读取Transaction02未提交的修改
READ COMMITTED:读已提交,要求Transaction01只能读取Transaction02已提交的修改
REPEATABLE READ:可重复读,确保Transaction01可以多次从一个字段中读取到相同的值,即Transaction01执行期间禁止其它事务对这个字段进行更新
SERIALIZABLE:串行化,确保Transaction01可以多次从一个字段中读取到相同的值,即Transaction01执行期间,禁止其它事务对这个表进行添加、更新、删除操作。可以避免任何并发问题,但性能十分低下
隔离级别
脏读
不可重复读
幻读
READ UNCOMMITTED
有
有
有
READ COMMITTED
无
有
有
REPEATABLE READ
无
无
有
SERIALIZABLE
无
无
无
各种数据库产品对事务隔离级别支持程度
隔离级别
Oracle
MySQL
READ UNCOMMITTED
❌
✅
READ COMMITTED
✅(默认)
✅
REPEATABLE READ
❌
✅(默认)
SERIALIZABLE
✅
✅
使用方式:@Transactional(isolation = Isolation.READ_UNCOMMITTED)
propagation传播行为:事务方法之间的调用,事务该如何进行使用
什么是事务的传播行为?
在service类中有a()方法和b()方法,a()方法上有事务,b()方法上也有事务,当a()方法执行过程中调用了b()方法,
事务是如何传递的?合并到一个事务里?还是开启一个新的事务?这就是事务传播行为。
一共有七种传播行为:
REQUIRED:支持当前事务,如果不存在就新建一个(默认)【没有就新建,有就加入】
SUPPORTS:支持当前事务,如果当前没有事务,就以非事务方式执行【有就加入,没有就不管了】
MANDATORY:必须运行在一个事务中,如果当前没有事务正在发生,将抛出一个异常【有就加入,没有就抛异常】
REQUIRES_NEW:开启一个新的事务,如果一个事务已经存任,则特这个存在的事务挂起 【不管有没有,直接开启一个新事务,开启的新事务和之前的事务不存在嵌套关系,之前事务被挂起】
NOT_SUPPORTED:以非事务方式运行,如果有事务存在,挂起当前事务【不支持事务,存在就挂起】
NEVER:以非事务方式运行,如果有事务存在,抛出异常【不支持事务,存在就抛异常】
NESTED:如果当前正有一个事务在进行中,则该方法应当运行在一个嵌套式事务中。被嵌套的事务可以独立于外层事务进行提交或回滚。如果外层事务不存在,行为就像REQUIRED一样。【有事务的话,就在这个事务里再嵌套一个完全独立的事务,嵌套的事务可以独立的提交和回滚。没有事务就和REQUIRED一样】。
使用全注解配置事务 创建配置类,同时需要注释掉bean.xml内所有bean标签内容,否则会引起冲突
1 2 3 4 5 6 7 8 9 10 11 12 13 14 15 16 17 18 19 20 21 22 23 24 25 26 27 28 29 30 31 32 33 34 35 36 37 38 39 40 41 42 43 44 45 46 47 48 package org.example.tx.config;import com.alibaba.druid.pool.DruidDataSource;import org.springframework.context.annotation.Bean;import org.springframework.context.annotation.ComponentScan;import org.springframework.context.annotation.Configuration;import org.springframework.jdbc.core.JdbcTemplate;import org.springframework.jdbc.datasource.DataSourceTransactionManager;import org.springframework.transaction.annotation.EnableTransactionManagement;import javax.sql.DataSource;@Configuration @ComponentScan("org.example.tx") @EnableTransactionManagement public class SpringConfig {@Bean public DataSource getDataSource () {DruidDataSource druidDataSource = new DruidDataSource ();"com.mysql.cj.jdbc.Driver" );"root" );"11111111" );"jdbc:mysql://localhost:3306/spring?characterEncoding=utf8&useSSL=false" );return druidDataSource;@Bean(name = "jdbcTemplate") public JdbcTemplate getJdbcTemplate (DataSource dataSource) {JdbcTemplate jdbcTemplate = new JdbcTemplate ();return jdbcTemplate;@Bean public DataSourceTransactionManager getDataSourceTransactionManager (DataSource dataSource) {DataSourceTransactionManager dataSourceTransactionManager = new DataSourceTransactionManager ();return dataSourceTransactionManager;