【study】Spring学习part05 AOP面向切面编程 需求:制作一个计算器,包括加减乘除。还需要日志在核心业务前后做输出
代码实现
新建计算器类接口Calculator,定义四则运算
1
2
3
4
5
6
7
8
9
10
11
12
package org.example.demo;public interface Calculator {int add (int a, int b) ;int sub (int a, int b) ;int mul (int a, int b) ;int div (int a, int b) ;
定义接口实现CalculatorImpl,实现四则运算的简单操作
1
2
3
4
5
6
7
8
9
10
11
12
13
14
15
16
17
18
19
20
21
22
23
24
25
26
27
28
29
30
31
32
33
34
35
36
37
38
39
40
package org.example.demo.impl;import org.example.demo.Calculator;public class CalculatorImpl implements Calculator {@Override public int add (int a, int b) {int result = a + b;"方法内部result = " + result);return result;@Override public int sub (int a, int b) {int result = a - b;"方法内部result = " + result);return result;@Override public int mul (int a, int b) {int result = a * b;"方法内部result = " + result);return result;@Override public int div (int a, int b) {int result = a / b;"方法内部result = " + result);return result;
定义接口实现CalculatorLogImpl,增加日志输出
1
2
3
4
5
6
7
8
9
10
11
12
13
14
15
16
17
18
19
20
21
22
23
24
25
26
27
28
29
30
31
32
33
34
35
36
37
38
39
40
41
42
43
44
45
46
47
48
package org.example.demo.impl;import org.example.demo.Calculator;public class CalculatorLogImpl implements Calculator {@Override public int add (int a, int b) {"[日志] add方法开始执行, 参数是:%d, %d" , a, b);int result = a + b;"方法内部result = " + result);"[日志] add方法执行结束, 结果是:%d" , result);return result;@Override public int sub (int a, int b) {"[日志] sub方法开始执行, 参数是:%d, %d" , a, b);int result = a - b;"方法内部result = " + result);"[日志] sub方法执行结束, 结果是:%d" , result);return result;@Override public int mul (int a, int b) {"[日志] mul方法开始执行, 参数是:%d, %d" , a, b);int result = a * b;"方法内部result = " + result);"[日志] mul方法执行结束, 结果是:%d" , result);return result;@Override public int div (int a, int b) {"[日志] div方法开始执行, 参数是:%d, %d" , a, b);int result = a / b;"方法内部result = " + result);"[日志] div方法执行结束, 结果是:%d" , result);return result;
目前存在的问题
日志功能混合到一定,代码耦合度高,维护起来不方便
日志功能和核心业务能否分离?
如果将日志功能抽象出工具类并不能做到,因为还是耦合在了业务中。
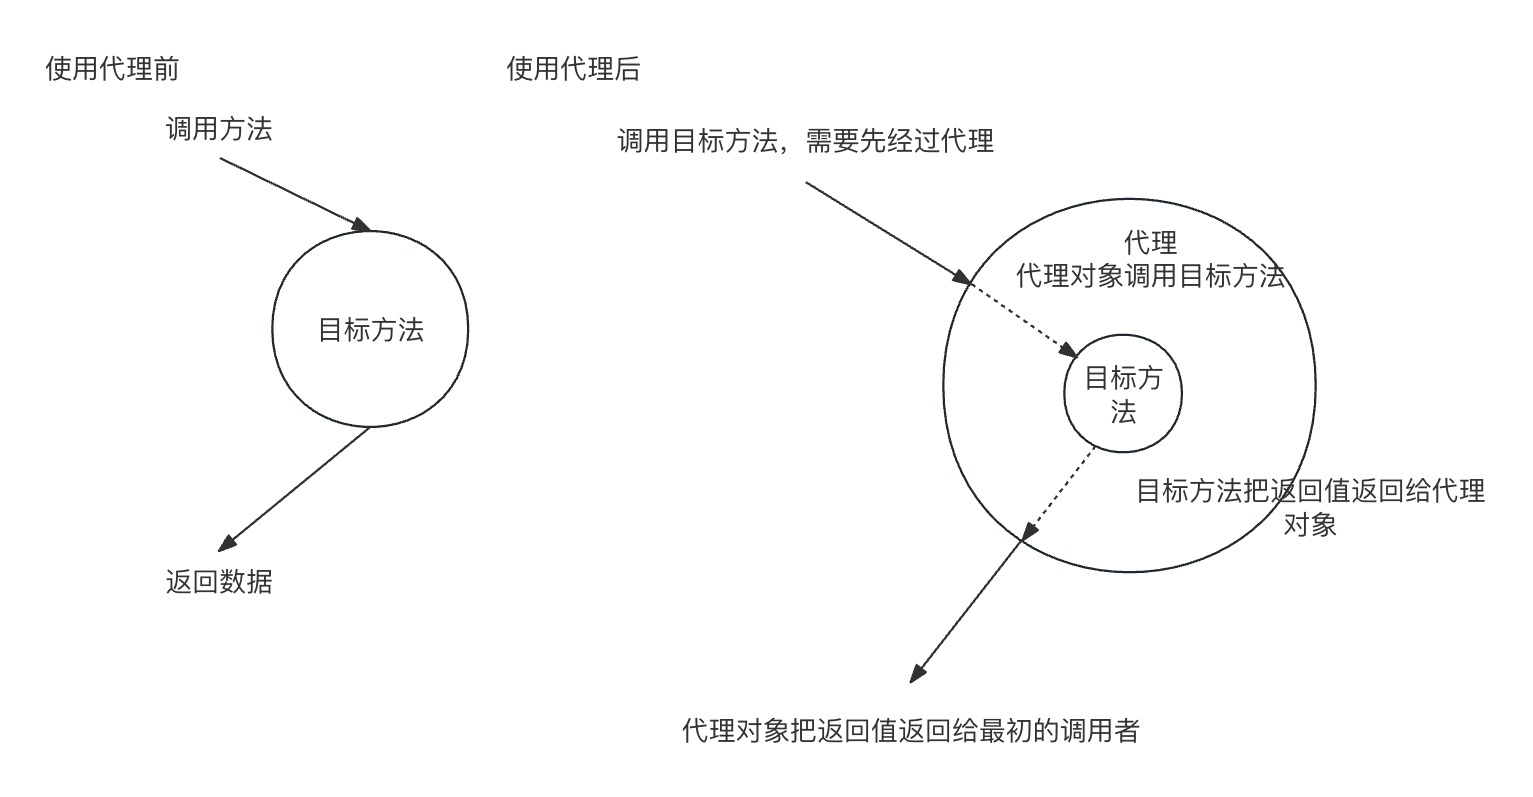
代理模式 设计模式中的一种,是结构型模式 。作用是通过提供一个代理类,让我们在调用目标的方法时,不再是直接对目标方法进行调用,而是通过代理类间接调用 ,让不属于目标方法核心逻辑的代码从目标方法中剥离出来——解耦 。调用目标方法时先调用代理对象的方法,减少对目标方法的调用和打扰,同时让附加功能能够集中在一起有利于统一维护。
代理:将非核心逻辑剥离出来以后,封装这些非核心逻辑的类、对象、方法。
目标:被代理“套用”了非核心逻辑代码的类、对象、方法。
静态代理 新建静态代理类proxy.CalculatorStaticProxy.java
1
2
3
4
5
6
7
8
9
10
11
12
13
14
15
16
17
18
19
20
21
22
23
24
25
26
27
28
29
30
31
32
33
34
35
36
37
38
39
40
41
42
43
44
45
46
47
48
49
50
51
52
53
54
55
56
57
58
59
60
61
62
63
64
65
66
67
68
69
70
71
72
73
74
package org.example.demo.proxy;import org.example.demo.Calculator;import java.lang.ref.PhantomReference;public class CalculatorStaticProxy implements Calculator {private Calculator calculator;public CalculatorStaticProxy (Calculator calculator) {this .calculator = calculator;@Override public int add (int a, int b) {"[日志] add方法开始执行, 参数是:%d, %d" , a, b);int result = calculator.add(a, b);"[日志] add方法执行结束, 结果是:%d" , result);return result;@Override public int sub (int a, int b) {"[日志] sub方法开始执行, 参数是:%d, %d" , a, b);int result = calculator.sub(a, b);"[日志] sub方法执行结束, 结果是:%d" , result);return result;@Override public int mul (int a, int b) {"[日志] mul方法开始执行, 参数是:%d, %d" , a, b);int result = calculator.mul(a, b);"[日志] mul方法执行结束, 结果是:%d" , result);return result;@Override public int div (int a, int b) {"[日志] div方法开始执行, 参数是:%d, %d" , a, b);int result = calculator.div(a, b);"[日志] div方法执行结束, 结果是:%d" , result);return result;
当前存在问题,日志功能并没有抽取出来,不具备灵活性。将来有任何日志需求都需要一个代理类来实现。
动态代理 定义代理工厂ProxyFactory,
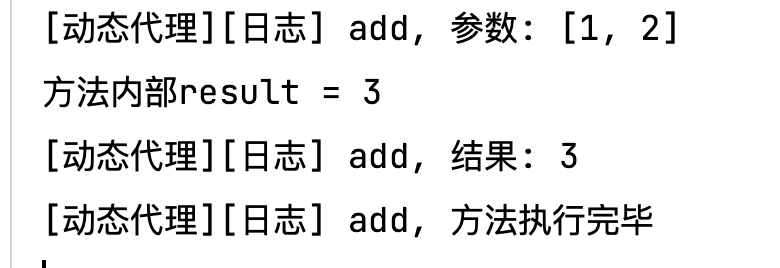
1
2
3
4
5
6
7
8
9
10
11
12
13
14
15
16
17
18
19
20
21
22
23
24
25
26
27
28
29
30
31
32
33
34
35
36
37
38
39
40
41
42
43
44
45
46
47
48
49
50
51
52
53
54
55
56
57
58
59
60
61
package org.example.demo.proxy;import java.lang.reflect.InvocationHandler;import java.lang.reflect.Method;import java.lang.reflect.Proxy;import java.util.Arrays;public class ProxyFactory {private final Object target;public ProxyFactory (Object target) {this .target = target;public Object getProxy () {ClassLoader classLoader = target.getClass().getClassLoader();InvocationHandler invocationHandler = new InvocationHandler () {@Override public Object invoke (Object proxy, Method method, Object[] args) throws Throwable {Object result = null ;try {"[动态代理][日志] " + method.getName() + ", 参数: " + Arrays.toString(args));"[动态代理][日志] " + method.getName() + ", 结果: " + result);catch (Exception e) {"[动态代理][日志] " + method.getName() + ", 异常: " + e.getMessage());finally {"[动态代理][日志] " + method.getName() + ", 方法执行完毕" );return result;return Proxy.newProxyInstance(classLoader, interfaces, invocationHandler);
测试单元
1
2
3
4
5
6
7
@Test public void testCalculator () {ProxyFactory proxyFactory = new ProxyFactory (new CalculatorImpl ());Calculator proxy = (Calculator) proxyFactory.getProxy();1 , 2 );
输出结果
AOP AOP (Aspect Oriented Programming)是一种设计思想,是软件设计领域中的面向切面编程,它是面向对象编程的一种补充和完善,它以通过预编译方式和运行期动态代理方式实现,在不修改源代码的情况下,给程序动态统一添加额外功能的一种技术 。利用AOP可以对业务逻辑的各个部分进行隔离,从而使得业务逻辑各部分之问的耦合降低,提高程序的可重用性,同时提高了开发的效率。
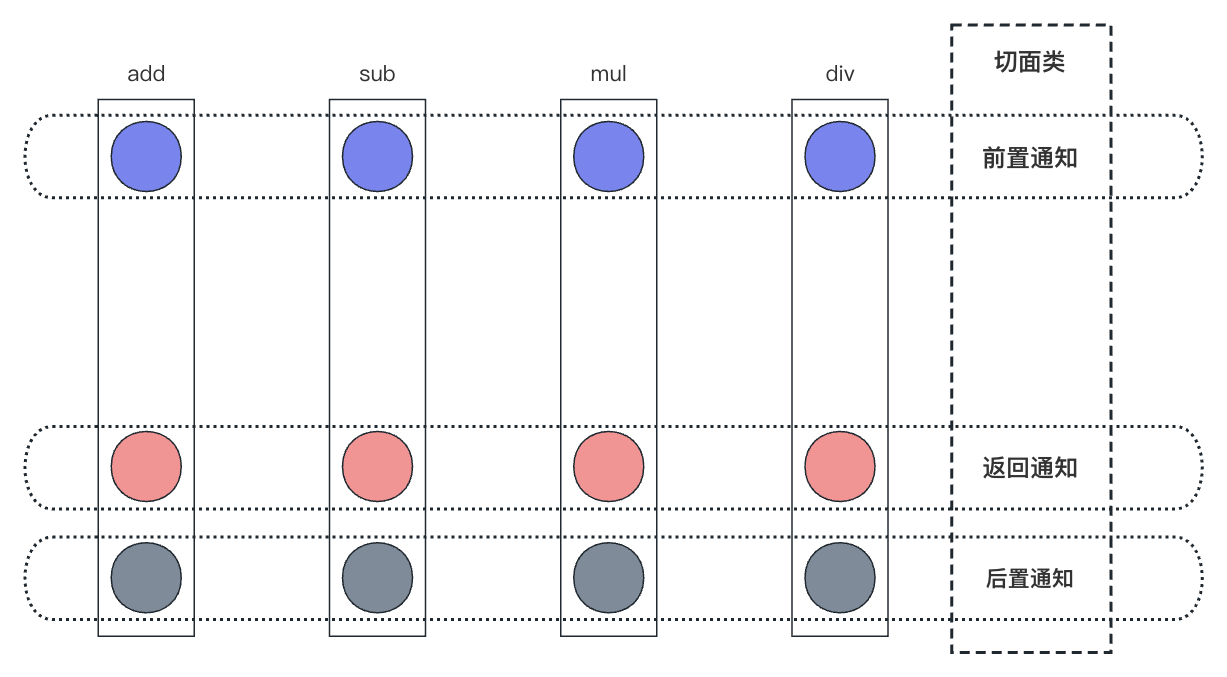
1. 横切关注点 分散在每个、各个模块中解决同一样的问题,例如用户验证、日志管理、事务处理、数据缓存都属于横切关注点 。
从每个方法中抽取出来的同一类非核心业务。在同一个项目中,我们可以使用多个横切关注点对相关方法进行多个不同方面的增强。
2. 通知(增强) 增强,想要增强的功能,例如安全、事务、日志等。
每一个横切关注点上要做的事情都需要写一个方法来实现,这样的方法叫做通知方法。
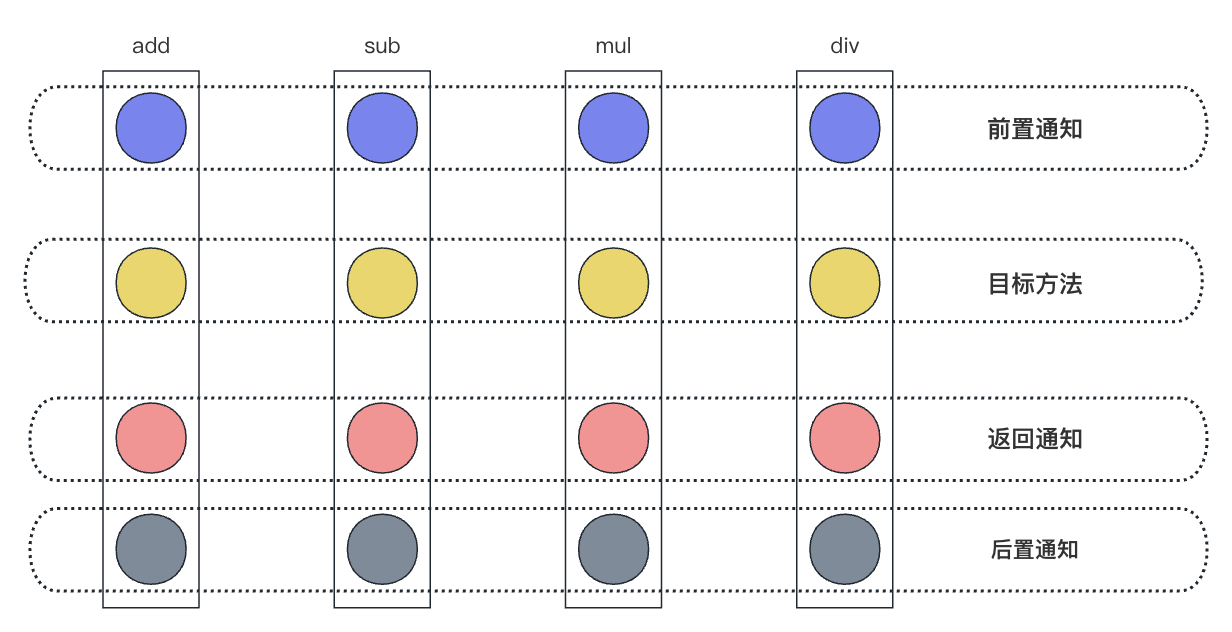
前置通知:在被代理的目标方法前执行
返回通知:在被代理的目标方法成功结束 后执行(寿终正寝)
异常通知:在被代理的目标方法异常结束 后执行(死于非命)
后置通知:在被代理的目标方法最终结束 后执行(盖棺定论)
环绕通知:使用try...catch...finally结构围绕着整个 被代理的目标方法,包括上面四种通知对应的所有位置
3. 切面 封装通知方法类
4. 目标 被代理的目标对象
5. 代理 向目标对象应用通知之后创建的代理对象。
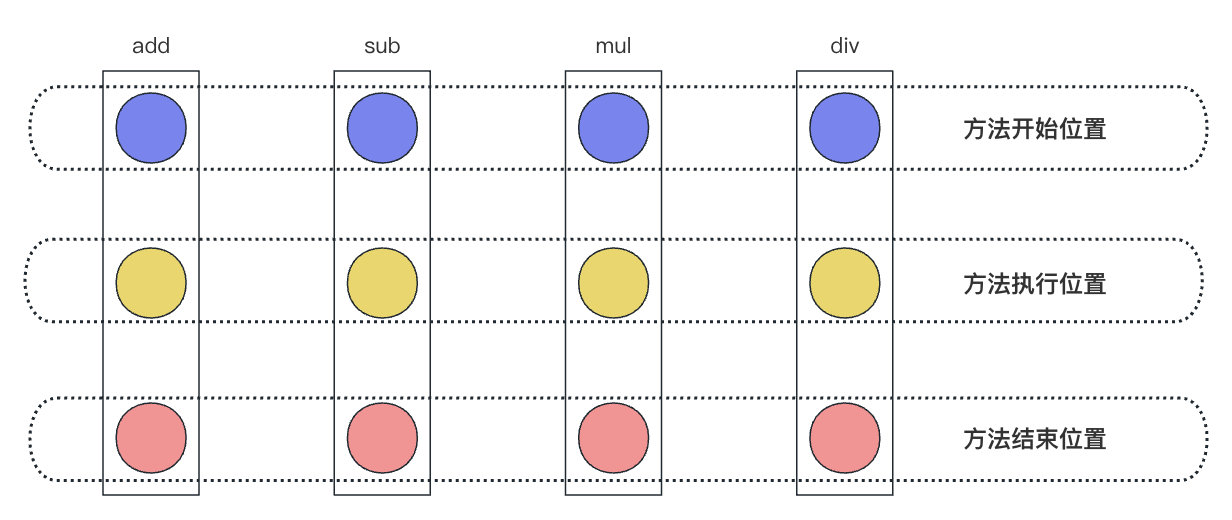
6. 连接点 这是一个纯逻辑的概念
把每个方法排成一排,每一个横切位置看成x轴方向,把方法从上到下执行顺序看成y轴,x轴和y轴交叉点就是连接点。通俗说,就是Spring允许使用通知的地方
7. 切入点 定位连接点的方式。
每个类的方法中都包含多个连接点,所以连接点是类中客观存在的事物(从逻辑上来说),
如果把连接点看作数据库中的记录,那么切入点就是查询记录的SQL 语句。
Spring 的 AOP 技术可以通过切入点定位到特定的连接点。通俗说,要实际去增强的方法
切点通过 org.springframework.aop.Pointcut 接口进行描述,它使用类和方法作为连接点的查询条件。
基于注解的AOP 1. 添加依赖 1 2 3 4 5 6 7 8 9 10 11 12 <dependency > <groupId > org.springframework</groupId > <artifactId > spring-aop</artifactId > <version > 6.0.2</version > </dependency > <dependency > <groupId > org.springframework</groupId > <artifactId > spring-aspects</artifactId > <version > 6.0.2</version > </dependency >
2. 创建目标资源
接口
实现类
同计算器的例子Calculator.java,CalculatorImpl.java,放入新的包annotationaop当中
1 2 3 4 5 6 7 8 9 10 11 12 13 package org.example.annotationaop;public interface Calculator {int add (int a, int b) ;int sub (int a, int b) ;int mul (int a, int b) ;int div (int a, int b) ;
1 2 3 4 5 6 7 8 9 10 11 12 13 14 15 16 17 18 19 20 21 22 23 24 25 26 27 28 29 30 31 32 33 34 35 36 37 38 39 40 41 42 43 package org.example.annotationaop.impl;import org.example.annotationaop.Calculator;import org.springframework.stereotype.Component;@Component public class CalculatorImpl implements Calculator {@Override public int add (int a, int b) {int result = a + b;"方法内部result = " + result);return result;@Override public int sub (int a, int b) {int result = a - b;"方法内部result = " + result);return result;@Override public int mul (int a, int b) {int result = a * b;"方法内部result = " + result);return result;@Override public int div (int a, int b) {int result = a / b;"方法内部result = " + result);return result;
3. 创建切面类
切入点
创建类型
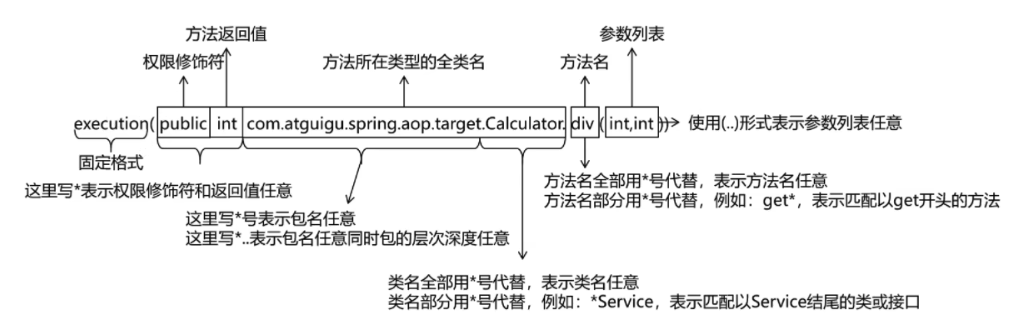
切入点表达式 五种通知类型注解,括号内参数为切入点表达式
前置 @Before()
返回 @AfterReturning()
异常 @AfterThrowing()
后置 @After()
环绕 @Around()
创建切面类LogAspect.java
1 2 3 4 5 6 7 8 9 10 11 12 13 14 15 16 17 18 19 20 21 22 23 24 25 26 27 28 29 30 31 32 33 34 35 36 37 38 39 40 41 42 43 44 45 46 47 48 49 50 51 52 53 54 55 56 57 58 59 60 61 62 63 64 65 66 67 68 69 70 71 72 73 74 75 76 77 78 79 80 81 82 package org.example.annotationaop;import org.aspectj.lang.JoinPoint;import org.aspectj.lang.ProceedingJoinPoint;import org.aspectj.lang.annotation.*;import org.springframework.stereotype.Component;import java.util.Arrays;@Aspect @Component public class LogAspect {@Before(value = "execution(public int org.example.annotationaop.impl.CalculatorImpl.*(..))") public void beforeMethod (JoinPoint joinPoint) {String methodName = joinPoint.getSignature().getName();"Logger --> 前置通知, 方法名称: " + methodName + ", 参数为: " + Arrays.toString(args));@After(value = "execution (* org.example.annotationaop.impl.CalculatorImpl.*(..))") public void afterMethod (JoinPoint joinPoint) {String methodName = joinPoint.getSignature().getName();"Logger --> 后置通知, 方法名称: " + methodName);@AfterReturning(value = "execution(* org.example.annotationaop.impl.CalculatorImpl.*(..))", returning = "results") public void afterReturningMethod (JoinPoint joinPoint, Object results) {String methodName = joinPoint.getSignature().getName();"Logger --> 返回通知, 方法名称: " + methodName + ", 返回结果: " + results);@AfterThrowing(value = "execution(* org.example.annotationaop.impl.CalculatorImpl.*(..))", throwing = "ex") public void afterThrowingMethod (JoinPoint joinPoint, Throwable ex) {String methodName = joinPoint.getSignature().getName();"Logger --> 异常通知, 方法名称: " + methodName + ", 异常结果: " + ex);@Around(value = "execution(* org.example.annotationaop.impl.CalculatorImpl.*(..))") public Object aroundMethod (ProceedingJoinPoint joinPoint) { String methodName = joinPoint.getSignature().getName();String argString = Arrays.toString(args);Object result = null ;try {"环绕通知, 目标方法之前执行" );"环绕通知, 目标方法返回值之后执行" );catch (Throwable throwable) {"环绕通知, 目标方法出现异常时执行" );finally {"环绕通知, 目标方法执行完毕时执行" );return result;
创建配置文件bean.xml
1
2
3
4
5
6
7
8
9
10
11
12
13
14
15
16
17
18
19
20
21
<?xml version="1.0" encoding="UTF-8" ?> <beans xmlns ="http://www.springframework.org/schema/beans" xmlns:xsi ="http://www.w3.org/2001/XMLSchema-instance" xmlns:context ="http://www.springframework.org/schema/context" xmlns:aop ="http://www.springframework.org/schema/aop" xsi:schemaLocation ="http://www.springframework.org/schema/beans http://www.springframework.org/schema/beans/spring-beans.xsd http://www.springframework.org/schema/context http://www.springframework.org/schema/context.xsd http://www.springframework.org/schema/aop http://www.springframework.org/schema/aop.xsd" ><context:component-scan base-package ="org.example.annotationaop" /> <aop:aspectj-autoproxy /> </beans >
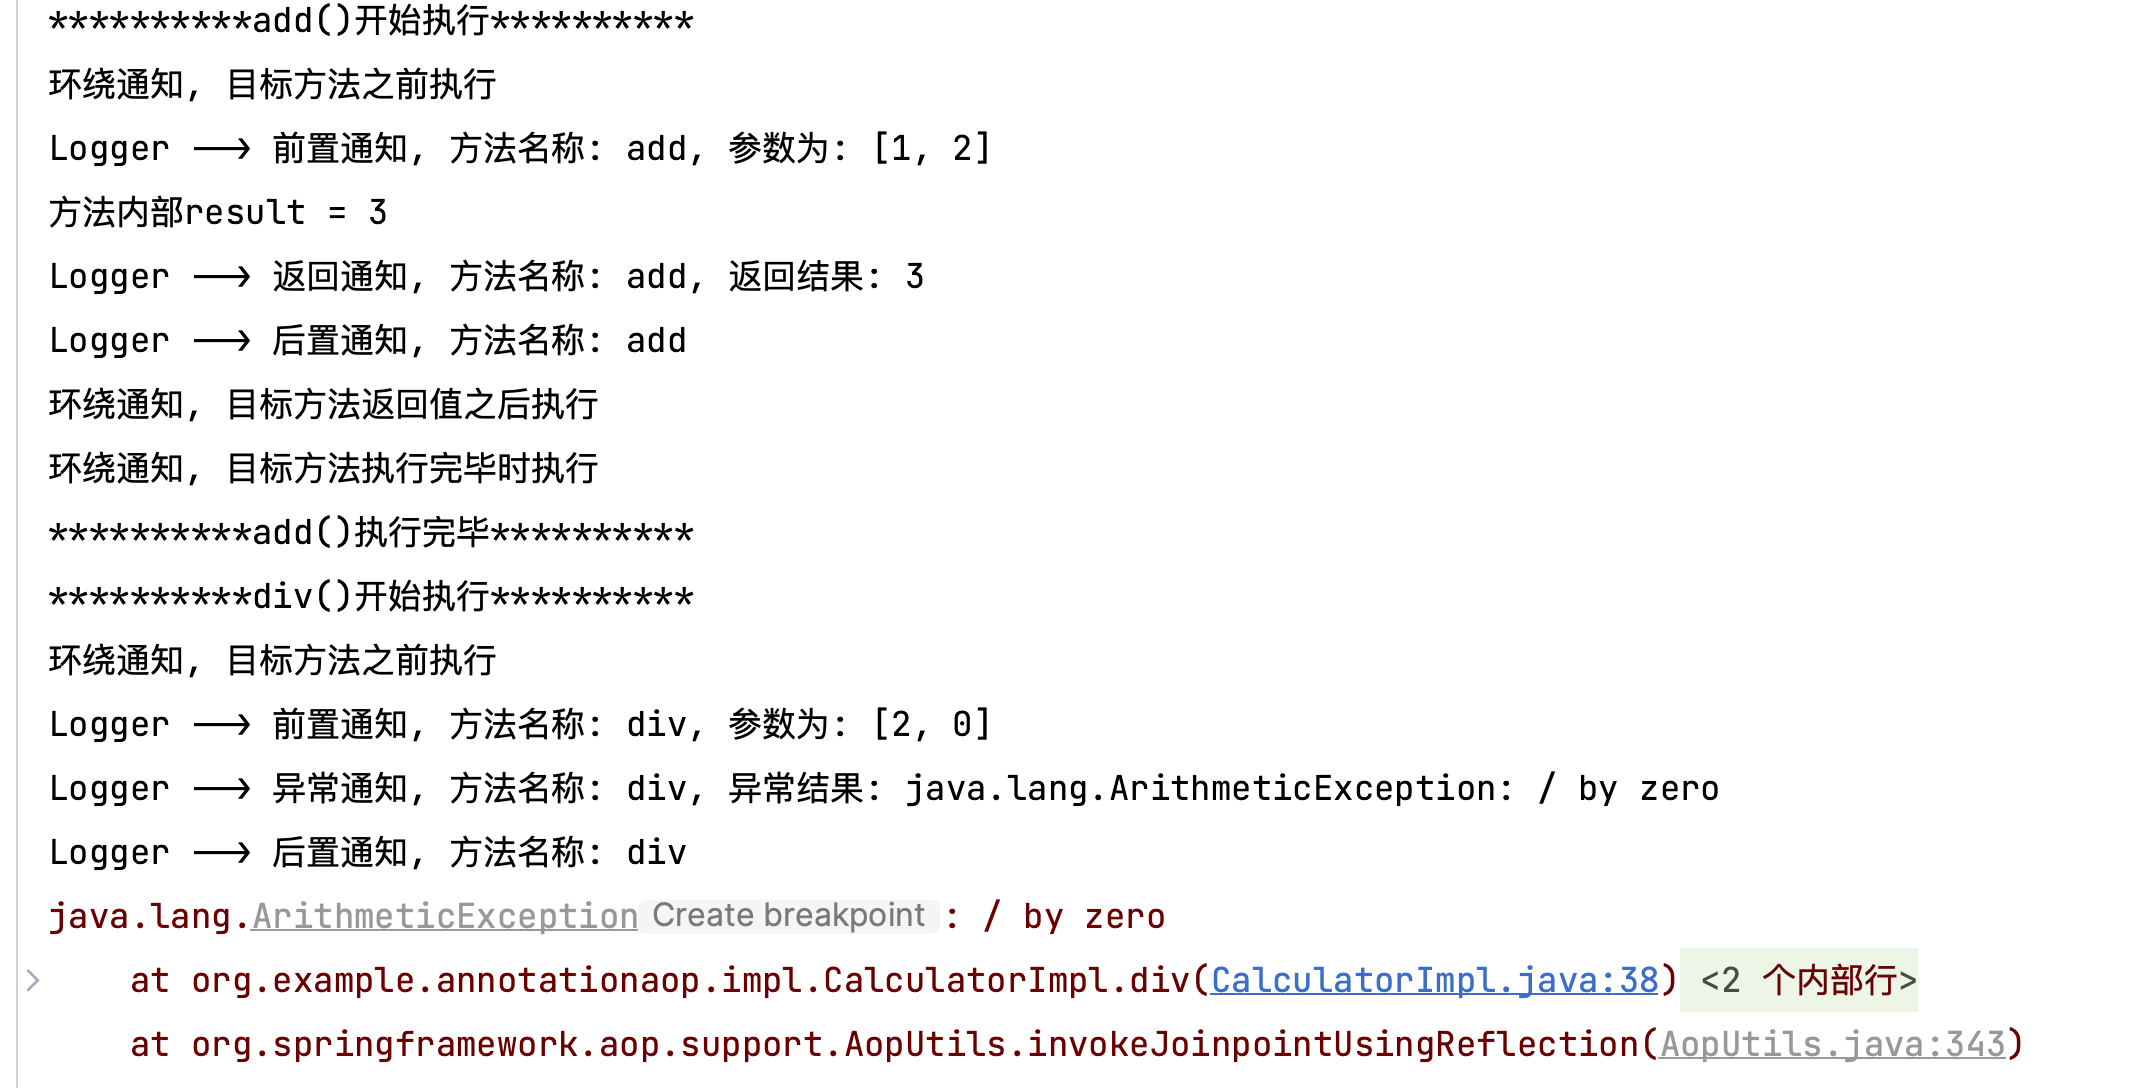
创建测试用例
1
2
3
4
5
6
7
8
9
10
11
@Test public void testAOPAdd () {ApplicationContext context = new ClassPathXmlApplicationContext ("bean.xml" );Calculator calculator = context.getBean(org.example.annotationaop.Calculator.class);"**********add()开始执行**********" );1 , 2 );"**********add()执行完毕**********" );"**********div()开始执行**********" );2 , 0 );"**********div()执行完毕**********" );
测试用例中使用2/0来引发错误异常。
切入点表达式的重用 定义方法pointCut(),在之前使用注解@Pointcut(),使用时候
1 2 3 4 5 6 7 8 9 10 11 @Pointcut(value = "execution(* org.example.annotationaop.impl.CalculatorImpl.*(..))") public void pointCut () {@After(value = "pointCut()") @After(value = "org.example.annotationaop.LogAspect.pointCut()")
切面优先级 使用Order()可以控制切面的优先级,越小级别越高
基于XML的AOP 计算器接口、实现类、切面类同上,切面类去掉方法前的所有注解。
新建配置文件bean-aop.xml,写入配置
1
2
3
4
5
6
7
8
9
10
11
12
13
14
15
16
17
18
19
20
21
22
23
24
25
26
27
28
29
30
31
32
33
34
35
36
37
<?xml version="1.0" encoding="UTF-8" ?> <beans xmlns ="http://www.springframework.org/schema/beans" xmlns:xsi ="http://www.w3.org/2001/XMLSchema-instance" xmlns:context ="http://www.springframework.org/schema/context" xmlns:aop ="http://www.springframework.org/schema/aop" xsi:schemaLocation ="http://www.springframework.org/schema/beans http://www.springframework.org/schema/beans/spring-beans.xsd http://www.springframework.org/schema/context http://www.springframework.org/schema/context/spring-context.xsd http://www.springframework.org/schema/aop http://www.springframework.org/schema/aop/spring-aop.xsd" ><context:component-scan base-package ="org.example.xmlaop" /> <aop:config > <aop:aspect ref ="logAspect" > <aop:pointcut id ="pointcut" expression ="execution(* org.example.xmlaop.impl.CalculatorImpl.*(..))" /> <aop:before method ="beforeMethod" pointcut-ref ="pointcut" /> <aop:after method ="afterMethod" pointcut-ref ="pointcut" /> <aop:after-returning method ="afterReturningMethod" pointcut-ref ="pointcut" returning ="results" /> <aop:after-throwing method ="afterThrowingMethod" pointcut-ref ="pointcut" throwing ="ex" /> <aop:around method ="aroundMethod" pointcut-ref ="pointcut" /> </aop:aspect > </aop:config > </beans >
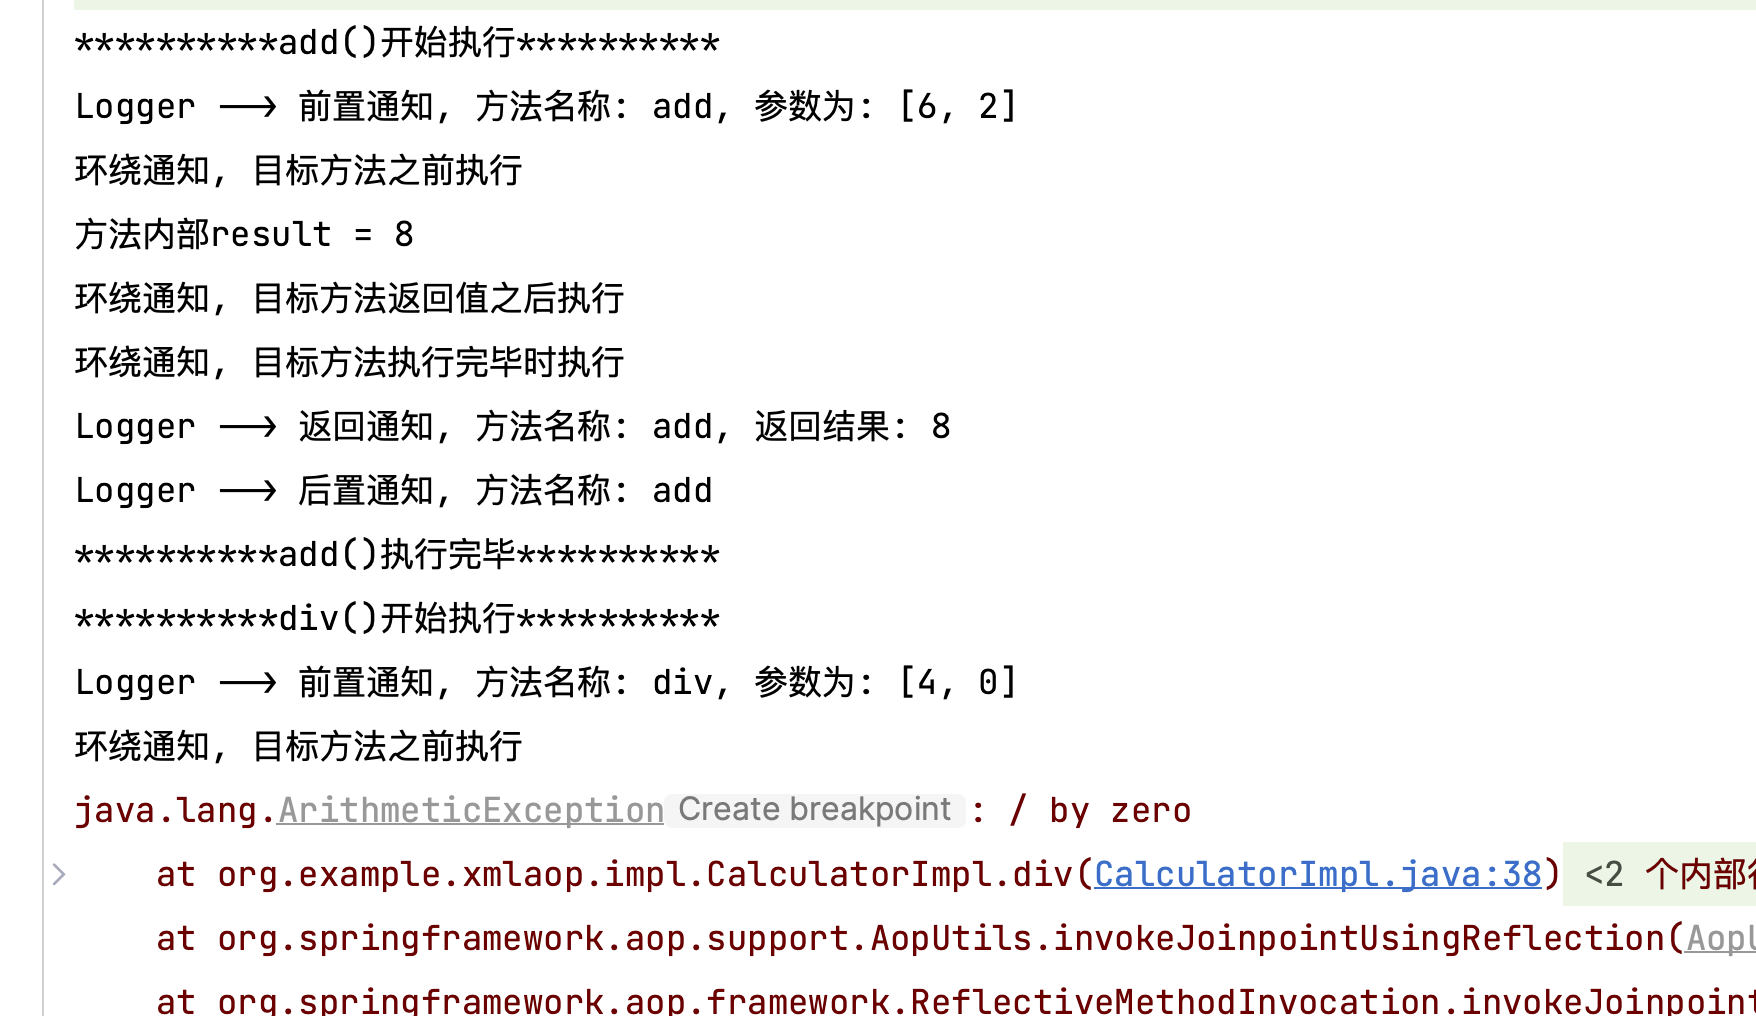
新建测试用例
1
2
3
4
5
6
7
8
9
10
11
@Test public void testXMLAOPAdd () {ApplicationContext context = new ClassPathXmlApplicationContext ("bean-aop.xml" );Calculator calculator = context.getBean(org.example.xmlaop.Calculator.class);"**********add()开始执行**********" );6 , 2 );"**********add()执行完毕**********" );"**********div()开始执行**********" );4 , 0 );"**********div()执行完毕**********" );
结果输出